Dicas Linux
Dicas para Linux
- Como descobrir (listar) o UUID e LABEL de todas as partições?
- Introduction to fstab
- EXECUTAR COMANDOS AO EFETUAR LOGIN OU LOGOUT NO LINUX
- O comando AWK com if, else e outras opções
- Verificar vida útil de um hard disk
- Some useful ssh config option
- Acesso SSH via web
- Como baixar repositórios de imagens do Bitnami
- Links para Ícones e Logotipos
Como descobrir (listar) o UUID e LABEL de todas as partições?
Link: https://bistrunka.net/2012/09/22/como-descobrir-listar-o-uuid-e-label-de-todas-as-particoes/
( How to find out (list) the UUID and LABEL all the partitions? )
Para listar o código UUID (universally unique identifier) e LABEL (rótulo/nome) de todas as partições de todos os discos do computador com um único comando basta utilizar, como root, o comando blkid:
sudo blkid
Olhe a saída no meu computador:
zumm@destino:~$ sudo blkid
/dev/sda1: LABEL=”Ubuntu-12.10″ UUID=”98e6d91d-9b8b-46e5-8429-e492044cbbd5″ TYPE=”ext4″
/dev/sda2: LABEL=”Vídeos” UUID=”457fce87-b36d-4364-971a-afaa11e39357″ TYPE=”ext4″
/dev/sda3: LABEL=”Backup” UUID=”ae9f9aeb-ae10-4e70-b680-396e0dd1c320″ TYPE=”ext4″
/dev/sda5: UUID=”c526a707-a8bb-431a-a2ea-398bb59f8146″ TYPE=”swap”
/dev/sda6: LABEL=”AMD64″ UUID=”a1d9c813-b4e7-4331-b4eb-6a08e44938e8″ TYPE=”ext4″
/dev/sda7: LABEL=”Gentoo” UUID=”9daf9b72-ec06-4175-b484-01ff1add6a37″ TYPE=”ext4″
/dev/sda8: LABEL=”Mint” UUID=”417d751e-faf9-4abc-ac43-271d47c973c6″ TYPE=”ext4″
/dev/sdb1: LABEL=”Ubuntu-11.04″ UUID=”0a3b9f72-bbd6-4e7f-bf11-6ef2043cf973″ TYPE=”ext4″
/dev/sdb2: LABEL=”Dados” UUID=”9100787c-03bf-4e22-8080-bd9a586fa2fe” TYPE=”ext3″
/dev/sdb3: LABEL=”Músicas” UUID=”4d759fd5-5ab2-4b92-b6b6-c015507672ce” TYPE=”ext3″
/dev/sdb4: UUID=”bdf9c723-c739-4e53-8810-a4e98c9ea8f5″ TYPE=”swap”
/dev/sdc1: LABEL=”Debian” UUID=”09aefbca-ddea-4068-be78-380fd959c658″ TYPE=”ext4″
/dev/sdc2: LABEL=”Arch” UUID=”1e2b868a-c634-4f3b-81b6-0e22e33552b3″ TYPE=”ext4″
/dev/sdc5: UUID=”d6609dbc-1720-4e3d-b316-730fcd87d6b4″ TYPE=”swap”
/dev/sdc6: LABEL=”Music” UUID=”414d9df7-1cdd-47e5-bda3-523b0a1f0a53″ TYPE=”ext4″
/dev/sdc7: LABEL=”Video” UUID=”356f8f81-8569-46ef-9fbe-fd8837bb6538″ TYPE=”ext4″
Outros comandos:
Para listar o UUID:
zumm@destino:~$ ls -l /dev/disk/by-uuid
total 0
lrwxrwxrwx 1 root root 10 2012-09-21 20:06 0a3b9f72-bbd6-4e7f-bf11-6ef2043cf973 -> ../../sdb1
lrwxrwxrwx 1 root root 10 2012-09-21 20:05 417d751e-faf9-4abc-ac43-271d47c973c6 -> ../../sda8
lrwxrwxrwx 1 root root 10 2012-09-21 20:06 457fce87-b36d-4364-971a-afaa11e39357 -> ../../sda2
lrwxrwxrwx 1 root root 10 2012-09-21 20:06 4d759fd5-5ab2-4b92-b6b6-c015507672ce -> ../../sdb3
lrwxrwxrwx 1 root root 10 2012-09-21 20:06 9100787c-03bf-4e22-8080-bd9a586fa2fe -> ../../sdb2
lrwxrwxrwx 1 root root 10 2012-09-21 20:05 98e6d91d-9b8b-46e5-8429-e492044cbbd5 -> ../../sda1
lrwxrwxrwx 1 root root 10 2012-09-21 20:05 9daf9b72-ec06-4175-b484-01ff1add6a37 -> ../../sda7
lrwxrwxrwx 1 root root 10 2012-09-21 20:05 a1d9c813-b4e7-4331-b4eb-6a08e44938e8 -> ../../sda6
lrwxrwxrwx 1 root root 10 2012-09-21 20:06 ae9f9aeb-ae10-4e70-b680-396e0dd1c320 -> ../../sda3
lrwxrwxrwx 1 root root 10 2012-09-21 20:05 bdf9c723-c739-4e53-8810-a4e98c9ea8f5 -> ../../sdb4
lrwxrwxrwx 1 root root 10 2012-09-21 20:05 c526a707-a8bb-431a-a2ea-398bb59f8146 -> ../../sda5
Para listar o LABEL:
zumm@destino:~$ ls -l /dev/disk/by-label
total 0
drwxr-xr-x 2 root root 220 2012-09-22 16:37 .
drwxr-xr-x 6 root root 120 2012-09-21 20:05 ..
lrwxrwxrwx 1 root root 10 2012-09-21 20:05 AMD64 -> ../../sda6
lrwxrwxrwx 1 root root 10 2012-09-21 20:06 Backup -> ../../sda3
lrwxrwxrwx 1 root root 10 2012-09-21 20:06 Dados -> ../../sdb2
lrwxrwxrwx 1 root root 10 2012-09-21 20:05 Livre -> ../../sda7
lrwxrwxrwx 1 root root 10 2012-09-21 20:05 Mint -> ../../sda8
lrwxrwxrwx 1 root root 10 2012-09-21 20:06 Músicas -> ../../sdb3
lrwxrwxrwx 1 root root 10 2012-09-21 20:06 Ubuntu-11.04 -> ../../sdb1
lrwxrwxrwx 1 root root 10 2012-09-21 20:05 Ubuntu-12.10 -> ../../sda1
lrwxrwxrwx 1 root root 10 2012-09-21 20:06 Vídeos -> ../../sda2
Listando os UUID’s de apenas um disco:
zumm@destino:~$ blkid /dev/sda[1-9]
/dev/sda1: LABEL=”Ubuntu-12.10″ UUID=”98e6d91d-9b8b-46e5-8429-e492044cbbd5″ TYPE=”ext4″
/dev/sda2: LABEL=”Vídeos” UUID=”457fce87-b36d-4364-971a-afaa11e39357″ TYPE=”ext4″
/dev/sda3: LABEL=”Backup” UUID=”ae9f9aeb-ae10-4e70-b680-396e0dd1c320″ TYPE=”ext4″
/dev/sda5: UUID=”c526a707-a8bb-431a-a2ea-398bb59f8146″ TYPE=”swap”
/dev/sda6: LABEL=”AMD64″ UUID=”a1d9c813-b4e7-4331-b4eb-6a08e44938e8″ TYPE=”ext4″
/dev/sda7: LABEL=”Gentoo” UUID=”9daf9b72-ec06-4175-b484-01ff1add6a37″ TYPE=”ext4″
/dev/sda8: LABEL=”Mint” UUID=”417d751e-faf9-4abc-ac43-271d47c973c6″ TYPE=”ext4″
Listando organizado por colunas
zumm@destino:~$ sudo blkid -o list -c /dev/null
Obtendo todas as informações de uma partição com o TUNE2FS
zumm@destino:~$ sudo tune2fs /dev/sda2
tune2fs 1.41.14 (22-Dec-2010)
Filesystem volume name: Vídeos
Last mounted on: /media/Vídeos
Filesystem UUID: 457fce87-b36d-4364-971a-afaa11e39357
Filesystem magic number: 0xEF53
Filesystem revision #: 1 (dynamic)
Filesystem features: has_journal ext_attr resize_inode dir_index filetype needs_recovery extent flex_bg sparse_super large_file huge_file uninit_bg dir_nlink extra_isize
Filesystem flags: signed_directory_hash
Default mount options: (none)
Filesystem state: clean
Errors behavior: Continue
Filesystem OS type: Linux
Inode count: 59375616
Block count: 237497855
Reserved block count: 11874892
Free blocks: 175586011
Free inodes: 59374910
First block: 0
Block size: 4096
Fragment size: 4096
Reserved GDT blocks: 967
Blocks per group: 32768
Fragments per group: 32768
Inodes per group: 8192
Inode blocks per group: 512
RAID stride: 32750
Flex block group size: 16
Filesystem created: Tue Nov 1 00:13:51 2011
Last mount time: Fri Sep 21 20:06:02 2012
Last write time: Fri Sep 21 20:06:02 2012
Mount count: 16
Maximum mount count: 32
Last checked: Mon Sep 17 08:18:46 2012
Check interval: 15552000 (6 months)
Next check after: Sat Mar 16 08:18:46 2013
Lifetime writes: 251 GB
Reserved blocks uid: 0 (user root)
Reserved blocks gid: 0 (group root)
First inode: 11
Inode size: 256
Required extra isize: 28
Desired extra isize: 28
Journal inode: 8
Default directory hash: half_md4
Directory Hash Seed: d714b716-999e-4eb1-b4b8-a27ae6964d3b
Journal backup: inode blocks
zumm@destino:~$
Já dá para brincar um pouquinho.
Introduction to fstab
Link: https://help.ubuntu.com/community/Fstab
The configuration file /etc/fstab contains the necessary information to automate the process of mounting partitions. In a nutshell, mounting is the process where a raw (physical) partition is prepared for access and assigned a location on the file system tree (or mount point).
- In general fstab is used for internal devices, CD/DVD devices, and network shares (samba/nfs/sshfs). Removable devices such as flash drives *can* be added to fstab, but are typically mounted by gnome-volume-manager and are beyond the scope of this document.
- Options for mount and fstab are similar.
- Partitions listed in fstab can be configured to automatically mount during the boot process.
- If a device/partition is not listed in fstab ONLY ROOT may mount the device/partition.
- Users may mount a device/partition if the device is in fstab with the proper options.
 For usage with network shares, see SettingUpNFSHowTo , SettingUpSamba and SSHFS.
Fstab File Configuration
 The syntax of a fstab entry is :
[Device] [Mount Point] [File System Type] [Options] [Dump] [Pass]
|
fields |
description |
|
<device> |
The device/partition (by /dev location or UUID) that contain a file system. |
|
<mount point> |
The directory on your root file system (aka mount point) from which it will be possible to access the content of the device/partition (note: swap has no mount point). Mount points should not have spaces in the names. |
|
<file system type> |
Type of file system (see LinuxFilesystemsExplained). |
|
<options> |
Mount options of access to the device/partition (see the man page for mount). |
|
<dump> |
Enable or disable backing up of the device/partition (the command dump). This field is usually set to 0, which disables it. |
|
<pass num> |
Controls the order in which fsck checks the device/partition for errors at boot time. The root device should be 1. Other partitions should be 2, or 0 to disable checking. |
Please refer to the examples section for sample entries. We have provided you some detailed explanations of each field:
Device
By default, Ubuntu now uses UUID to identify partitions.
UUID=xxx.yyy.zzz
To list your devices by UUID use blkid
sudo blkid
Alternative ways to refer to partitions:
- Label : LABEL=label
- Network ID
- Samba : //server/share
- NFS : server:/share
- SSHFS : sshfs#user@server:/share
- Device : /dev/sdxy (not recommended)
Mount point
A mount point is a location on your directory tree to mount the partition. The default location is /media although you may use alternate locations such as /mnt or your home directory.
You may use any name you wish for the mount point, but you must create the mount point before you mount the partition.
For example : /media/windows
sudo mkdir /media/windows
File System Type
You may either use auto or specify a file system. Auto will attempt to automatically detect the file system of the target file system and in general works well. In general auto is used for removable devices and a specific file system or network protocol for network shares.
Examples:
- auto
- vfat - used for FAT partitions.
- ntfs, ntfs-3g - used for ntfs partitions.
- ext4, ext3, ext2, jfs, reiserfs, etc.
- udf,iso9660 - for CD/DVD.
- swap.
Options
Options are dependent on the file system.
You may use "defaults" here and some typical options may include :
-
Ubuntu 8.04 and later uses relatime as default for linux native file systems. You can find a discussion of relatime here : http://lwn.net/Articles/244829. This relates to when and how often the last access time of the current version of a file is updated, i.e. when it was last read.
- defaults = rw, suid, dev, exec, auto, nouser, and async.
- ntfs/vfat = permissions are set at the time of mounting the partition with umask, dmask, and fmask and can not be changed with commands such as chown or chmod.
-
I advise dmask=027,fmask=137 (using umask=000 will cause all your files to be executable). More permissive options would be dmask=000,fmask=111.
-
-
For mounting samba shares you can specify a username and password, or better a credentials file. The credentials file contains should be owned by root.root with permissions = 0400 .
Common options :
- sync/async - All I/O to the file system should be done (a)synchronously.
- auto - The filesystem can be mounted automatically (at bootup, or when mount is passed the -a option). This is really unnecessary as this is the default action of mount -a anyway.
- noauto - The filesystem will NOT be automatically mounted at startup, or when mount passed -a. You must explicitly mount the filesystem.
- dev/nodev - Interpret/Do not interpret character or block special devices on the file system.
- exec / noexec - Permit/Prevent the execution of binaries from the filesystem.
- suid/nosuid - Permit/Block the operation of suid, and sgid bits.
- ro - Mount read-only.
- rw - Mount read-write.
- user - Permit any user to mount the filesystem. This automatically implies noexec, nosuid,nodev unless overridden.
- nouser - Only permit root to mount the filesystem. This is also a default setting.
- defaults - Use default settings. Equivalent to rw, suid, dev, exec, auto, nouser, async.
- _netdev - this is a network device, mount it after bringing up the network. Only valid with fstype nfs.
For specific options with specific file systems see:
Dump
This field sets whether the backup utility dump will backup file system. If set to "0" file system ignored, "1" file system is backed up.
Dump is seldom used and if in doubt use 0.
Pass (fsck order)
Fsck order is to tell fsck what order to check the file systems, if set to "0" file system is ignored.
Often a source of confusion, there are only 3 options :
- 0 == do not check.
- 1 == check this partition first.
- 2 == check this partition(s) next
In practice, use "1" for your root partition, / and 2 for the rest. All partitions marked with a "2" are checked in sequence and you do not need to specify an order.
Use "0" to disable checking the file system at boot or for network shares.
You may also "tune" or set the frequency of file checks (default is every 30 mounts) but in general these checks are designed to maintain the integrity of your file system and thus you should strongly consider keeping the default settings.
Examples
 The contents of the file will look similar to following:
# /etc/fstab: static file system information.
#
# <file system> <mount point>   <type>  <options>       <dump>  <pass>

proc  /proc  proc  defaults  0  0
# /dev/sda5
UUID=be35a709-c787-4198-a903-d5fdc80ab2f8  /  ext3  relatime,errors=remount-ro  0  1
# /dev/sda6
UUID=cee15eca-5b2e-48ad-9735-eae5ac14bc90  none  swap  sw  0  0

/dev/scd0  /media/cdrom0  udf,iso9660  user,noauto,exec,utf8  0  0
NOTE: These network share examples (samba, nfs, and sshfs) assume you have already set up the appropriate server.
# FAT ~ Linux calls FAT file systems vfat)
# /dev/hda1
UUID=12102C02102CEB83  /media/windows  vfat auto,users,uid=1000,gid=100,dmask=027,fmask=137,utf8  0  0

# NTFS ~ Use ntfs-3g for write access (rw)
# /dev/hda1
UUID=12102C02102CEB83  /media/windows  ntfs-3g  auto,users,uid=1000,gid=100,dmask=027,fmask=137,utf8  0  0

# Zip Drives ~ Linux recognizes ZIP drives as sdx'''4'''

# Separate Home
# /dev/sda7
UUID=413eee0c-61ff-4cb7-a299-89d12b075093  /home  ext3  nodev,nosuid,relatime  0  2

# Data partition
# /dev/sda8
UUID=3f8c5321-7181-40b3-a867-9c04a6cd5f2f  /media/data  ext3  relatime,noexec  0  2

# Samba
//server/share  /media/samba  cifs  user=user,uid=1000,gid=100  0  0
# "Server" = Samba server (by IP or name if you have an entry for the server in your hosts file
# "share" = name of the shared directory
# "user" = your samba user
# This set up will ask for a password when mounting the samba share. If you do not want to enter a password, use a credentials file.
# replace "user=user" with "credentials=/etc/samba/credentials" In the credentials file put two lines
# username=user
# password=password
# make the file owned by root and ro by root (sudo chown root.root /etc/samba/credentials && sudo chmod 400 /etc/samba/credentials)

# NFS
Server:/share  /media/nfs  nfs  rsize=8192 and wsize=8192,noexec,nosuid
# "Server" = Samba server (by IP or name if you have an entry for the server in your hosts file
# "share" = name of the shared directory

#SSHFS
sshfs#user@server:/share  fuse  user,allow_other  0  0
# "Server" = Samba server (by IP or name if you have an entry for the server in your hosts file
# "share" = name of the shared directory
File System Specific Examples
 Here are a couple of basic examples for different file system types. I will use /dev/sdb1 or /dev/hda2 for simplicity, but remember that any /dev location, UUID=<some_id>, or LABEL=<some_label> can work.
Extended file systems (ext)
Specifically, these are the ext2, ext3, and ext4 filesystems that are common as root filesystems in Linux. The main difference between ext2 and ext3 is that ext3 has journaling which helps protect it from errors when the system crashes. The more modern ext4 supports larger volumes along with other improvements, and is backward compatible with ext3.
A root filesystem:
UUID=30fcb748-ad1e-4228-af2f-951e8e7b56df / ext3 defaults,errors=remount-ro,noatime 0 1
A non-root file system, ext2:
/dev/sdb1 /media/disk2 ext2 defaults 0 2
File Allocation Table (FAT)
Specifically, fat16 and fat32, which are common for USB flash drives and flash cards for cameras and other devices.
/dev/hda2 /media/data1 vfat defaults,user,exec,uid=1000,gid=100,umask=000 0 0
/dev/sdb1 /media/data2 vfat defaults,user,dmask=027,fmask=137 0 0
New Technology File System (NTFS)
NTFS is typically used for a Windows partition.
/dev/hda2 /media/windows ntfs-3g defaults,locale=en_US.utf8 0 0
For a list of locales available on your system, run
-
locale -a
Hierarchical File System (HFS)
HFS, or more commonly, HFS+, are filesystems generally used by Apple computers.
For Read/Write mounting:
/dev/sdb2 /media/Macintosh_HD hfsplus rw,exec,auto,users 0 0
Note: if you want to write data on this partition, you must disable the journalization of this partition with diskutil under Mac OS.
For Read only:
/dev/sda2 /media/Machintosh_HD hfsplus ro,defaults 0 2
Note: if you want to have access to your files on Ubuntu, you must change the permission of the folders and contained files you want to access by doing in the apple terminal:
sudo chmod -R 755 Folder
"Staff" group should have appeared in this folder's info. You can do this on Music and Movies to access these files from Ubuntu.
Editing fstab
Please, before you edit system files, make a backup. The -B flag with nano will make a backup automatically.
To edit the file in Ubuntu, run:
gksu gedit /etc/fstab
To edit the file in Kubuntu, run:
kdesu kate /etc/fstab
To edit the file directly in terminal, run:
sudo nano -Bw /etc/fstab
- -B = Backup origional fstab to /etc/fstab~ .
- -w = disable wrap of long lines.
Alternate:
sudo -e /etc/fstab
Useful Commands
 To view the contents of /etc/fstab, run the following terminal command:
cat /etc/fstab
To get a list of all the UUIDs, use one of the following two commands:
sudo blkid
ls -l /dev/disk/by-uuid
To list the drives and relevant partitions that are attached to your system, run:
sudo fdisk -l
To mount all file systems in /etc/fstab, run:
sudo mount -a
Remember that the mount point must already exist, otherwise the entry will not mount on the filesystem. To create a new mount point, use root privileges to create the mount point. Here is the generalization and an example:
sudo mkdir /path/to/mountpoint
sudo mkdir /media/disk2
Other Resources
 Here are some more links for your convenience:
-
How to fstab (from the Ubuntu Forums)
EXECUTAR COMANDOS AO EFETUAR LOGIN OU LOGOUT NO LINUX
Para que um comando seja executado quando o usuário efetua LOGIN (iniciar uma sessão) ou LOGOUT (finalizar a sessão), insira o seu comando nos respectivos arquivos que devem estar localizados no HOME de cada usuário:
- .bash_login
- .bash_logout
Obs.: Se estes arquivos não existirem, você deve criá-los.
Exemplos:
1) Exibir uma mensagem quando o usuário efetua LOGIN (adicionar em .bash_login):
echo "Bem-vindo(a) ao Linux!"
2) Limpar a tela quando o usuário efetua LOGOUT (adicionar em .bash_logout):
clear
Para que os novos usuários herdem estes arquivos de configuração, copie-os para a pasta /etc/skel. Assim sempre que um novo usuário for criado, serão copiados os arquivos .bash_login e .bash_logout para sua pasta HOME.
Espero que seja útil!
O comando AWK com if, else e outras opções
Link: https://blog.ironlinux.com.br/o-comando-awk/
Assim como o SED , o AWK é uma ferramenta para manipulação de texto. No entanto, o AWK também é considerado uma linguagem de programação. Com ele é possível pesquisar palavras num arquivo, identificar padrões, realizar substituições e muito mais! Além disso, o AWK suporta expressões regulares, o que permite realizar matches de padrões complexos.
Output de exemplo
Antes de tudo, para realizarmos as operações/exemplos com o AWK, vamos utilizar a saída do comando ps u:
ps u

1 | Utilizações básicas
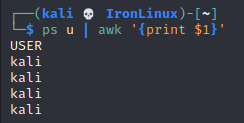
1.1 | Printar a primeira coluna
Para apresentar apena a primeira coluna é possível utilizar o comando abaixo. A primeira coluna é representada por $1:
ps u | awk '{print $1}'
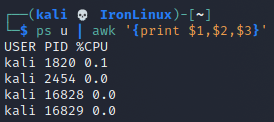
1.2 | Printar múltiplas colunas
É possível trazer múltiplas colunas utilizando o comando abaixo. OBS: A vírgula neste exemplo representará um espaço comum na saída final:
ps u | awk '{print $1,$2,$3}'
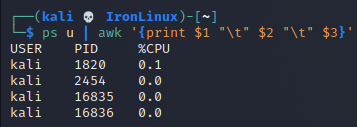
1.3 | Printar múltiplas colunas separadas por Tab
Utilizando "\t" é possível separar as colunas com Tab:
ps u | awk '{print $1 "\t" $2 "\t" $3}'
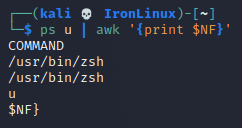
1.4 | Printar o último elemento
Utilizando $NF é possível trazer o último elemento (neste caso é a coluna COMMAND):
ps u | awk '{print $NF}'
1.5 | Ignorar a primeira linha
É comum precisar remover a primeira linha de um arquivo para depois trabalhar com os dados. Para fazer isso, basta utilizar o comando abaixo:
ps u | awk 'NR!=1'

1.6 | Substituir texto
Para substituir um texto, podemos utilizar a função sub(), conforme o exemplo abaixo, que substitui a string “kali” por “outro-usuario”:
ps u | awk -e 'sub(/kali/, "outro-usuario")'

OBS: A função sub() substitui apenas a primeira ocorrência, uma vez por linha. Caso queira substituir mais de uma ocorrência, utilize a função gsub().
2 | Utilizando um outro delimitador
Por padrão, o delimitador do AWK é o espaço (ou tab). No entanto, em alguns casos, você precisará indicar um outro delimitador (como por exemplo vírgula ou ponto e vírgula). Desta forma, no exemplo abaixo, estamos utilizando ; como delimitador e printando o segundo elemento:
echo 'oi;tudo;certo' | awk -F ';' '{print $2}'

3 | Condicionais
3.1 | AWK com if
Para exemplificar o uso de condicionais (if) vamos utilizar o arquivo notas.txt que possui o seguinte conteúdo:
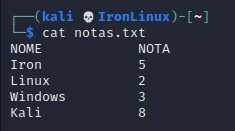
Por exemplo, para printar a linha inteira se a primeira coluna for a string Iron:
awk '{ if ($1 == "Iron") print $0 }' notas.txt

Por exemplo, para printar a nota do aluno Iron em uma frase:
awk '{ if ($1 == "Iron") print "A nota do Aluno", $1, "foi", $2}' notas.txt

3.2 | AWK com if/else
No exemplo abaixo estamos utilizando if/else para determinar quais alunos reprovaram ou passaram (com nota maior que 5). Também estamos utilizando NR!=1 para ignorar a primeira linha:
awk 'NR!=1 {if ($2 >=5 ) print $0,"=>","Passou!"; else print $0,"=>","Reprovou!"}' notas.txt

3.3 | Cheatsheet de condicionais
| Condicionais | Descrição |
|---|---|
| if ($5 >= 10) | Se a quinta coluna for maior ou igual a 10 |
| if ($3 == 10) | Se a terceira coluna for igual a 10 |
| if ($1 == “Linux”) | Se a primeira coluna for igual a string Linux |
| if ($1 == “Linux” | |
| if ($1 ==“Linux” && $2 > 5) | Se a primeira coluna for igual a string Linux e a segunda coluna for maior que 5 |
4 | Utilizando REGEX
4.1 | Exemplos com REGEX
Na regex abaixo, estamos printando a linha inteira caso a segunda coluna se inicie com o número 1:
ps u | awk -e '$2 ~ /^1/ {print $0}'

Na regex abaixo estamos printando todas as linhas cuja coluna 2 não comecem com o número 1:
ps u | awk -e '$2 !~ /^1/ {print $0}'

4.2 | Cheatsheet de REGEX
| Regex | Descrição |
|---|---|
| [mr] | Letras** m** ou r |
| [a-z] | Qualquer letra de a à z |
| [a-zA-Z] | Qualquer letra de A à Z (maiúsculo ou minúsculo) |
| [A-Z0-9]{5} | 5 caracteres, podendo ser qualquer letra de A à Z ou números de 0 a 9 |
5 | Alguns outros usos interessantes
5.1 | Pegar linhas entre dois padrões
Vamos utilizar o arquivo padrao.txt abaixo para realizar as operações:
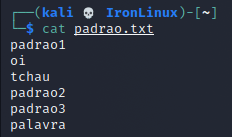
Caso você queira printar, todas as linhas entre “padrao1” e “padrao2”:
awk '/padrao1/{flag=1;next}/padrao2/{flag=0}flag' padrao.txt

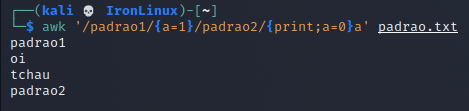
Caso queira que “padrao1” e “padrao2” também seja printado:
awk '/padrao1/{a=1}/padrao2/{print;a=0}a' padrao.txt
5.2 | Adicionar um prefixo nas linhas
Para adicionar um prefixo nas linhas pode-se utilizar a função gensub(), veja o exemplo abaixo, onde adicionamos a palavra “Prefixos” em todas as linhas que comecem com caracteres alfanuméricos:
awk -e ' { print gensub(/^[a-zA-Z0-9]*/, "Prefixos &",1) }' notas.txt

Por fim, agradecemos a leitura e esperamos que este post tenha te ajudado de alguma maneira! Caso tenha alguma dúvida, entre em contato conosco pelo Telegram , Facebook ou Instagram ! Veja mais posts no IronLinux !
Tags:
Posts relacionados

Redirecionar a saída padrão e de erros
Quando é executado um comando ou algum script no Linux é possível redirecionar a saída padrão e de erros para não ser printado em tela ou que seja direcionado à algum lugar especifico.

O comando SED no Linux
O comando SED é uma ótima ferramenta de edição de arquivos ou de formatação de resultados de comandos, com ele você pode pesquisar, localizar e substituir, inserir ou excluir palavras, números e etc.
![Estressando MEM, DISCO e CPU com Stress-ng [Debian9]](https://blog.ironlinux.com.br/images/blog-posts/uploads/2020/04/Stress-ng-1_hu20ef07f6d87399612b4205b98ee978d4_28688_1110x0_resize_q100_h2_lanczos_2.webp)
Estressando MEM, DISCO e CPU com Stress-ng [Debian9]
O STRESS-NG Com a ferramenta Stress-ng podemos literalmente realizar o Stress de alguns recursos do seu servidor, sendo eles: Cpu, memória e disco.
Verificar vida útil de um hard disk
Link: https://www.hdsentinel.com/hard_disk_sentinel_linux.php
Hard Disk Sentinel Linux Edition (FREE) |
 |
By using Hard Disk Sentinel Linux console edition, it is possible to examine the temperature and health information (and more) of IDE, S-ATA (SATA II also), SCSI and USB hard disks connected to motherboard or external controller cards. The user must be root to use this software or start it with sudo.
To display hard disk / SSD status in a graphical interface, download Hard Disk Sentinel Linux GUI (Graphical User Interface) package. Thanks for Gregory25!
To simplify starting Hard Disk Sentinel Linux Edition, it is possible to use one of the Linux Desktop Installers for the actual Linux distribution which allows starting directly from the desktop without the need of starting manually from a console. Thanks for Marc Sayer for these packages!
To receive daily status reports, please check the HDSentinel_EmailUtil.zip package. Thanks for Raul del Cid Lopez for this script!
List of features
- display hard disk / solid state disk information on the terminal
- create comprehensive report about the disk system, including both hard disk and SSD specific features (for example, media rotation rate, TRIM command, etc.)
- display and manage acoustic setting of hard disks (on supported USB disks also)
- offers outputs for both users and scripts/other applications to process
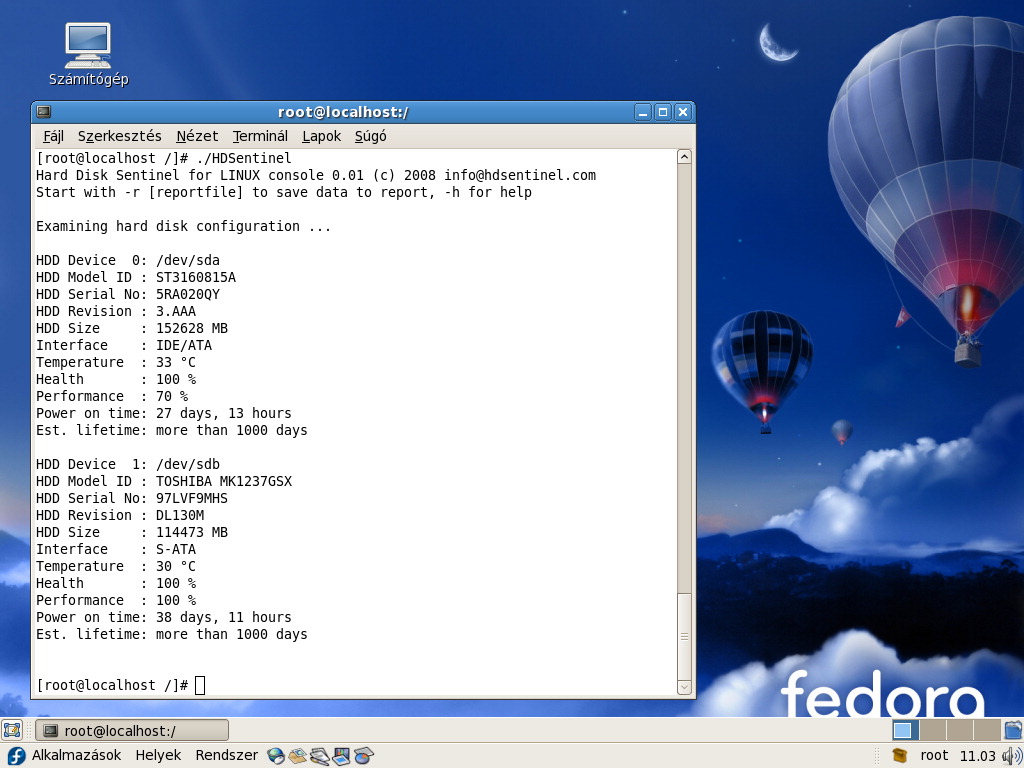
The following information are displayed:
- detected hard disk number and device name (for example /dev/sda)
- size, model ID, serial number, revision and interface of all detected hard disks
- temperature, health and performance values
- power on time (days, hour, minutes - if supported)
Note: this is for informational purposes only, the value displayed under Windows (after some minutes of testing) may be more accurate - acoustic management settings (if supported and -aam or -setaam option is used
Command line switches
The switches are NOT case sensitive. Upper and lower case can be used to specify them.
- -h - displays help and usage information
- -r [report file] - automatically save report to filename (default: report.txt)
- -html - use with -r to save HTML format report (-html -r report.html)
- -mht - use with -r to save MHT format report (-mht -r report.mht)
- -autosd - detect industrial SD card type and save flag file (see How to: monitor (micro) SD card health and status for more details)
- -dev /dev/sdX - detect and report only the specified device without accessing others
- -devs d1,d2 - detect (comma separated) devices in addition to default ones eg. /dev/sda,/dev/sdb,/dev/sdc
- -onlydevs d1,d2 - detect (comma separated) devices only eg. /dev/sda,/dev/sdb,/dev/sdc
- -nodevs d1,d2 - exclude detection of (comma separated) devices eg. /dev/sda,/dev/sdb,/dev/sdc
- -dump - dump report to stdout (can be used with -xml to dump XML output instead of text)
- -xml - create and save XML report instead of TXT
- -solid - solid output (drive, tempC, health%, power on hours, model, S/N, size)
- -verbose - detailed detection information and save temporary files (only for debug purposes)
- -aam - display acoustic management settings (current and recommended level)
- -setaam drive_num|ALL level(hex)80-FE|QUIET|LOUD - set acoustic level on drive 0..n (or all)
80 or QUIET is the lowest (most silent) setting, FE or LOUD is the highest (fastest) setting
For example: hdsentinel -setaam 0 loud - Configures drive 0 to fastest (loud) setting. Same as hdsentinel -setaam 0 FE
Please send saved XML or TXT reports, questions or ideas to info@hdsentinel.com to help improving this tool.
License
Hard Disk Sentinel Linux edition is FREE. You can freely distribute and use it to analyse hard disk status. However, if you like this tool and would like to keep it updated, please support further development by registering the Windows version of the software.
Usage of Hard Disk Sentinel Linux version
After downloading the file below, please follow these steps to use it:
- double click to open and decompress it to any folder
- open a terminal window and navigate to the folder
- change file permissions to make it executable by using chmod 755 HDSentinel
- launch it by entering sudo ./HDSentinel [options]
sudo is not required if you logged in as "root".
Examples
Optimize complete system for silence: hdsentinel -setaam all quiet
Optimize complete system for high performance (but louder disk access): hdsentinel -setaam all loud
Select a balanced level between silence and performance on drive 0: hdsentinel -setaam 0 C0
Note: some disks do not support balanced settings and they may select the most silent (80) or high performance (FE) setting instead.
Please start hsentinel without parameters to see drive assignments (eg. /dev/sda) to drive indexes.
Due to the high amount of requests, it is possible to create minimal output which can be easily parsed and processed for further use. Some examples are:
List disk drives, temperature (in Celsius), health %, power on hours, disk model, disk serial, size:
hdsentinel -solid. Sample results:
  /dev/sda 42   3  4830 WDC_WD800JD-8LSA0   WD-WMAM9F937837   76324
  /dev/sdb 30 100  6128 ST3250624A          5ND3J94R         238472
  /dev/sdc 46 100 10982 WDC_WD2500JS-00MHB0 WD-WCANK8705209  238475
  /dev/sdd  ?   ?     ? GENERIC_CF_READER   9999                  0
  /dev/sde  ?   ?     ? GENERIC_SD_READER   9999               1963
List only temperature, drive, size:
hdsentinel -solid | awk '{print $2, $1, $7}'
  42 /dev/sda 76324
  30 /dev/sdb 238472
  46 /dev/sdc 238475
  ? /dev/sdd 0
  ? /dev/sde 1963
List only temperature, drive, model ID, highest temperature on top, drives without temperature information (for example card readers) removed:
hdsentinel -solid | awk '{print $2, $1, $5}' | grep -v "^?" | sort -nr
  46 /dev/sdc WDC_WD2500JS-00MHB0
  42 /dev/sda WDC_WD800JD-8LSA0
  30 /dev/sdb ST3250624A
List only health, temperature, drive, lowest health on top, drives without temperature information (for example card readers) removed:
hdsentinel -solid | awk '{print $3, $2, $1}' | grep -v "^?" | sort -n
  3 42 /dev/sda
  100 30 /dev/sdb
  100 46 /dev/sdc
Note that the spaces in hard disk model ID and serial number are replaced with underscore (_).
If you have any ideas, thoughts about the automatic processing of output or if you have complete script(s) you want to share with other users, please send a mail and it will be published on this page with the name and credits of the sender of the script.
Download Hard Disk Sentinel Linux
Hard Disk Sentinel 32-bit Linux console version - executable, gzip-compressed
Hard Disk Sentinel 64-bit Linux console version - executable, zip-compressed
Hard Disk Sentinel Linux console version for Raspberry PI (ARM CPU) - executable, gzip-compressed
Hard Disk Sentinel Linux console version for NAS boxes (ARMv5 CPU) - executable, non-compressed (see notes below)
Hard Disk Sentinel Linux console version for NAS boxes / Raspberry PI 4 64-bit (ARMv8 / ARM64 CPU) - executable, zip-compressed
Can be used with Synology D220j and other Synology NAS models with ARMv8 CPU
Compatibility
Kernel support is required to detect and display information about SATA hard disks. This version was successfully tested under the following systems:
- blackPanther OS v16.2 SE
- CentOS 5, 6 and newer
- Fedora 5, 6, 7, 8, 9, 10, 15 and newer
- Ubuntu 8.04 server kernel 2.6.24-16-server, 9.04
- Kubuntu 8.04
- Xubuntu 8.04
- Slackware 11.0
- UHU Linux 2.1
- SuSe 10.2, SuSe 10.3 (SuSe 10.0 - NOT working, reports wanted)
- Debian Lenny 5.0
- Debian GNU/Linux 6.0.1 Squeez
- Raspberry PI (ARM CPU)
- NAS boxes (ARM CPU): WD MyBook Live, D-Link DNS-320LW two bay Sharecenter, D-Link DNS-327L two bay Sharecenter, Seagate FreeAgent DockStar, Zyxel NSA320, Synology DS211. DSM 5.0-4493 update 3
Successfully tested with Adaptec SCSI controllers and SCSI hard disks, and with external enclosures built with different USB-ATA bridge in chips USB Hard disks, hard disk enclosures. Supports LSI / Intel / IBM RAID controllers too.
Updates
0.20
| 7/7/2023 |
|
0.19
| 28/2/2021 |
|
0.18
| 7/11/2019 |
|


0.17
| 30/8/2017 |
|


0.16
| 13/9/2016 |
|
0.08 - Download Hard Disk Sentinel Linux 0.08 version
| 6/3/2012 |
|
0.03 - Download this version
| 21/7/2009 |
|
0.02 - Download this version
| 25/7/2008 |
|
0.01 - Download this version
| 29/4/2008 |
|
Raspberry PI

NAS boxes with ARM CPU

The Linux version of Hard Disk Sentinel also available for NAS boxes built with ARM CPUs. The NAS box should have telnet / SSH access in order to download and use this tool.
To get Telnet / SSH access, special firmware version(s) or additional packages (like the fun_plug may be required. Putty tool is also required to connect the NAS box and access its console.
Usage:
-
get Telnet / SSH access to the NAS box and log-in to your device by using putty.exe
-
enter wget http://www.hdsentinel.com/hdslin/armv5/hdsentinelarm to download the latest ARMv5 CPU build.
To simplify things, the file is not compressed. -
enter chmod 755 hdsentinelarm to set the proper permission (executable). You may use chmod +x hdsentinelarm instead.
-
enter ./hdsentinelarm to start the Hard Disk Sentinel on the NAS and get hard disk status information.
Tested on:
-
WD MyBook Live
-
D-Link DNS-320LW two bay Sharecenter
-
Seagate FreeAgent DockStar
Some useful ssh config option
Link: https://taozhi.medium.com/some-useful-ssh-config-option-7858a58c5e7b
When managing multiple Linux servers, we use SSH for logging in and performing tasks. Understanding how to configure SSH properly is essential for efficient server management.
Basic Config
Host my_jump
    identityfile "~/.ssh/my_jump"
    hostname 47.254.197.212
    hostkeyalias my_jump
    user root
    port 22
In the above config, “my_jump” is the hostname supporting wildcards to match multiple servers simultaneously.
The identityfile specifies the authorized private keys, hostname is the server’s IP address, and hostkeyalias is useful for connecting to the server when its IP address changes without needing to update known_hosts. The user and port specify the SSH login credentials.
Reuse the sock
Upon relogging into the server, how can we bypass entering the password and reuse the previous session to quickly reconnect? We should the control setting in ssh config.
Host *
    serveraliveinterval 60
    keepalive yes
    controlmaster auto
    controlpath ~/.ssh/socks/%h-%k-%p-%r
    controlpersist yes
By using the above configuration, we set the controlpath for all servers using the ‘*’ symbol in the Host field. The controlpath specifies the socket path.
%h represents the host IP.
%k represents the hostname.
%p represents the port.
%r represents the username.
When you connect to a server using ssh, you should see a socket file present. ~/.ssh/socks.

Set Jump Server
To secure production servers inaccessible for direct login, we can first connect to a jump server, then use SSH through the jump server to access the production server. Automating this process is possible by configuring ProxyCommand or ProxyJump in the SSH settings.
Config the jump server a and b first.
Host jump-server-a
 HostKeyAlias jump-server-a
 Hostname 100.97.200.66

Host jump-server-b
 HostKeyAlias jump-server-b
 Hostname 100.97.200.67

Host jump-server-*
 HashKnownHosts no
 ServerAliveInterval 60
 Port 22
 User root
 PreferredAuthentications publickey
 IdentityFile ~/.ssh/id_taozhi
 Controlpath ~/.ssh/socks/%h-%k-%p-%r
 ControlMaster auto
 ControlPersist 5m
 setenv LC_ALL=C.UTF-8
Config the production servers
Host production-server-a
 ProxyJump jump-server-a

Host production-server-b
 ProxyJump jump-server-b

Host production-server-c
 ProxyCommand ssh -W %h:%p jump-server-b

Host production-server-*
 LogLevel ERROR
 UserKnownHostsFile /dev/null
 StrictHostKeyChecking no
 Port 22
 User root
 IdentityFile ~/.ssh/id_taozhi
 controlmaster no
 setenv LC_ALL=C.UTF-8
Following configuration, we can login to the production server locally.
ssh -o Hostname=172.16.28.19 production-server-a
You can log in to the production server with one command now.
Conclusions
SSH is a versatile command with numerous configuration options. More options can be found for reading here. If you have any useful ssh config you are using, please comment it, let using it together.
Acesso SSH via web
Link: https://github.com/butlerx/wetty/tree/main
WeTTY = Web + TTY.
Terminal access in browser over http/https

Terminal over HTTP and https. WeTTY is an alternative to ajaxterm and anyterm but much better than them because WeTTY uses xterm.js which is a full fledged implementation of terminal emulation written entirely in JavaScript. WeTTY uses websockets rather than Ajax and hence better response time.
Prerequisites
- node >=18
- make
- python
- build-essential
Install
npm -g i wetty
Usage
$ wetty --help
Options:
  --help, -h      Print help message                                   [boolean]
  --version       Show version number                                  [boolean]
  --conf          config file to load config from                       [string]
  --ssl-key       path to SSL key                                       [string]
  --ssl-cert      path to SSL certificate                               [string]
  --ssh-host      ssh server host                                       [string]
  --ssh-port      ssh server port                                       [number]
  --ssh-user      ssh user                                              [string]
  --title         window title                                          [string]
  --ssh-auth      defaults to "password", you can use "publickey,password"
                  instead                                               [string]
  --ssh-pass      ssh password                                          [string]
  --ssh-key       path to an optional client private key (connection will be
                  password-less and insecure!)                          [string]
  --ssh-config    Specifies an alternative ssh configuration file. For further
                  details see "-F" option in ssh(1)                     [string]
  --force-ssh     Connecting through ssh even if running as root       [boolean]
  --known-hosts   path to known hosts file                              [string]
  --base, -b      base path to wetty                                    [string]
  --port, -p      wetty listen port                                     [number]
  --host          wetty listen host                                     [string]
  --command, -c   command to run in shell                               [string]
  --allow-iframe  Allow wetty to be embedded in an iframe, defaults to allowing
                  same origin                                          [boolean]
Open your browser on http://yourserver:3000/wetty and you will prompted to login. Or go to http://yourserver:3000/wetty/ssh/<username> to specify the user beforehand.
If you run it as root it will launch /bin/login (where you can specify the user name), else it will launch ssh and connect by default to localhost. The SSH connection can be forced using the --force-ssh option.
If instead you wish to connect to a remote host you can specify the --ssh-host option, the SSH port using the --ssh-port option and the SSH user using the --ssh-user option.
Check out the Flags docs for a full list of flags
Docker container
To use WeTTY as a docker container, a docker image is available on docker hub. To run this image, use
docker run --rm -p 3000:3000 wettyoss/wetty --ssh-host=<YOUR-IP>
and you will be able to open a ssh session to the host given by YOUR-IP under the URL http://localhost:3000/wetty.
It is recommended to drive WeTTY behind a reverse proxy to have HTTPS security and possibly Let’s Encrypt support. Popular containers to achieve this are nginx-proxy and traefik. For traefik there is an example docker-compose file in the containers directory.
FAQ
Check out the docs
What browsers are supported?
WeTTY supports all browsers that xterm.js supports.
Author
👤 Cian Butler butlerx@notthe.cloud
- Mastodon: @butlerx@mastodon.ie
- Github: @butlerx
Contributing ✨
Contributions, issues and feature requests are welcome!
Feel free to check issues page.
Please read the development docs for installing from source and running is dev node
Thanks goes to these wonderful people (emoji key):
Como baixar repositórios de imagens do Bitnami
Informação extraída do ChatGPT
O endereço que você passou:
https://github.com/bitnami/containers/tree/main/bitnami/suitecrm/8/debian-12
...é uma página de diretório no GitHub, não um servidor de arquivos direto. Portanto, você não pode usar wget ou curl para baixar o diretório diretamente.
Mas há duas formas corretas de baixar esse conteúdo:
✅ Opção 1: Clonar apenas esse diretório com git sparse-checkout (recomendado)
Se você não quiser baixar o repositório todo, mas apenas esse diretório, use git sparse-checkout.
Passos:
# 1. Clone o repositório, mas sem o conteúdo
git clone --depth 1 --filter=blob:none --sparse https://github.com/bitnami/containers.git
# 2. Vá para a pasta clonada
cd containers
# 3. Ative sparse-checkout para baixar só o diretório desejado
git sparse-checkout set bitnami/suitecrm/8/debian-12
Resultado:
Você terá somente a pasta bitnami/suitecrm/8/debian-12 localmente, sem baixar o repositório completo (~centenas de MB normalmente).
✅ Opção 2: Baixar o repositório inteiro (caso aceite o tamanho maior)
Se preferir baixar tudo (incluindo outras imagens), use:
git clone https://github.com/bitnami/containers.git
cd containers/bitnami/suitecrm/8/debian-12
❌ Por que wget ou curl não funciona?
-
GitHub não oferece diretórios como arquivos ZIP automaticamente via URL de pasta.
-
wgetbaixaria o HTML da página, não os arquivos reais do diretório.
Shell Script para baixar aplicativos pelo caminho no Bitnami
#!/bin/bash
echo "🔧 Exemplo de caminho: bitnami/suitecrm/8/debian-12"
read -p "Digite o caminho completo do diretório no repositório Bitnami Containers: " TARGET_DIR
# Repositório Bitnami Containers
REPO_URL="https://github.com/bitnami/containers.git"
REPO_DIR="bitnami-containers"
# Limpar se pasta já existir
if [ -d "$REPO_DIR" ]; then
echo "Removendo pasta existente: $REPO_DIR"
rm -rf "$REPO_DIR"
fi
echo -e "\n📦 Iniciando download do diretório '$TARGET_DIR'...\n"
# Clonar com sparse-checkout
git clone --depth 1 --filter=blob:none --sparse "$REPO_URL" "$REPO_DIR" || {
echo "❌ Falha ao clonar repositório."
exit 1
}
cd "$REPO_DIR" || {
echo "❌ Erro ao acessar diretório $REPO_DIR"
exit 1
}
# Baixar apenas o diretório informado
if git sparse-checkout set "$TARGET_DIR"; then
echo -e "\n✅ Diretório '$TARGET_DIR' baixado com sucesso!"
echo "📁 Caminho local: $REPO_DIR/$TARGET_DIR"
else
echo -e "\n❌ Diretório '$TARGET_DIR' não encontrado no repositório."
exit 1
fi
Links para Ícones e Logotipos
LInk: https://iconduck.com/