N8N docker
API Automação whatsapp
- Instalação e configurações N8N
- Instalação N8N docker (1)
- Instalação N8N docker com worker
- Instalação, configuração e atualização N8N Docker
- Aplicações N8N docker
Instalação e configurações N8N
Instalação e configurações N8N
Instalação N8N docker (1)
Link: https://docs.n8n.io/hosting/installation/server-setups/docker-compose/#5-create-docker-compose-file
If you have already installed Docker and Docker-Compose, then you can start with step 4.
Self-hosting knowledge prerequisites
Self-hosting n8n requires technical knowledge, including:
- Setting up and configuring servers and containers
- Managing application resources and scaling
- Securing servers and applications
- Configuring n8n
n8n recommends self-hosting for expert users. Mistakes can lead to data loss, security issues, and downtime. If you aren't experienced at managing servers, n8n recommends n8n Cloud.
Latest and Next versions
n8n releases a new minor version most weeks. The latest version is for production use. next is the most recent release. You should treat next as a beta: it may be unstable. To report issues, use the forum.
Current latest: 1.58.2
Current next: 1.59.0
1. Install Docker#
This can vary depending on the Linux distribution used. You can find detailed instructions in the Docker documentation. The following example is for Ubuntu:
sudo apt-get remove docker docker-engine docker.io containerd runc
sudo apt-get update
sudo apt-get install ca-certificates curl gnupg lsb-release
sudo mkdir -p /etc/apt/keyrings
curl -fsSL https://download.docker.com/linux/ubuntu/gpg | sudo gpg --dearmor -o /etc/apt/keyrings/docker.gpg
echo "deb [arch=$(dpkg --print-architecture) signed-by=/etc/apt/keyrings/docker.gpg] https://download.docker.com/linux/ubuntu $(lsb_release -cs) stable" | sudo tee /etc/apt/sources.list.d/docker.list > /dev/null

sudo apt-get update
sudo apt-get install docker-ce docker-ce-cli containerd.io
2. Optional: Non-root user access#
Run when logged in as the user that should also be allowed to run docker:
sudo usermod -aG docker ${USER}
su - ${USER}
3. Install Docker-Compose#
This can vary depending on the Linux distribution used. You can find detailed instructions in the Docker documentation.
The example below is for Ubuntu:
sudo apt-get install docker-compose-plugin4. DNS setup#
Add A record to route the subdomain accordingly:
Type: A
Name: n8n (or the desired subdomain)
IP address: <IP_OF_YOUR_SERVER>
5. Create Docker Compose file#
Create a docker-compose.yml file. Paste the following in the file:
version: "3.7"

services:
  traefik:
    image: "traefik"
    restart: always
    command:
      - "--api=true"
      - "--api.insecure=true"
      - "--providers.docker=true"
      - "--providers.docker.exposedbydefault=false"
      - "--entrypoints.web.address=:80"
      - "--entrypoints.web.http.redirections.entryPoint.to=websecure"
      - "--entrypoints.web.http.redirections.entrypoint.scheme=https"
      - "--entrypoints.websecure.address=:443"
      - "--certificatesresolvers.mytlschallenge.acme.tlschallenge=true"
      - "--certificatesresolvers.mytlschallenge.acme.email=${SSL_EMAIL}"
      - "--certificatesresolvers.mytlschallenge.acme.storage=/letsencrypt/acme.json"
    ports:
      - "80:80"
      - "443:443"
    volumes:
      - traefik_data:/letsencrypt
      - /var/run/docker.sock:/var/run/docker.sock:ro

  n8n:
    image: docker.n8n.io/n8nio/n8n
    restart: always
    ports:
      - "127.0.0.1:5678:5678"
    labels:
      - traefik.enable=true
      - traefik.http.routers.n8n.rule=Host(`${SUBDOMAIN}.${DOMAIN_NAME}`)
      - traefik.http.routers.n8n.tls=true
      - traefik.http.routers.n8n.entrypoints=web,websecure
      - traefik.http.routers.n8n.tls.certresolver=mytlschallenge
      - traefik.http.middlewares.n8n.headers.SSLRedirect=true
      - traefik.http.middlewares.n8n.headers.STSSeconds=315360000
      - traefik.http.middlewares.n8n.headers.browserXSSFilter=true
      - traefik.http.middlewares.n8n.headers.contentTypeNosniff=true
      - traefik.http.middlewares.n8n.headers.forceSTSHeader=true
      - traefik.http.middlewares.n8n.headers.SSLHost=${DOMAIN_NAME}
      - traefik.http.middlewares.n8n.headers.STSIncludeSubdomains=true
      - traefik.http.middlewares.n8n.headers.STSPreload=true
      - traefik.http.routers.n8n.middlewares=n8n@docker
    environment:
      - N8N_HOST=${SUBDOMAIN}.${DOMAIN_NAME}
      - N8N_PORT=5678
      - N8N_PROTOCOL=https
      - NODE_ENV=production
      - WEBHOOK_URL=https://${SUBDOMAIN}.${DOMAIN_NAME}/
      - GENERIC_TIMEZONE=${GENERIC_TIMEZONE}
    volumes:
      - n8n_data:/home/node/.n8n

volumes:
  traefik_data:
    external: true
  n8n_data:
    external: true
If you are planning on reading/writing local files with n8n (for example, by using the Read/Write Files from Disk node, you will need to configure a data directory for those files here. If you are running n8n as a root user, add this under volumes for the n8n service:
- /local-files:/filesIf you are running n8n as a non-root user, add this under volumes for the n8n service:
- /home/<YOUR USERNAME>/n8n-local-files:/filesYou will now be able to write files to the /files directory in n8n and they will appear on your server in either /local-files or /home/<YOUR USERNAME>/n8n-local-files, respectively.
6. Create .env file#
Create an .env file and change it accordingly.
# The top level domain to serve from
DOMAIN_NAME=example.com

# The subdomain to serve from
SUBDOMAIN=n8n

# DOMAIN_NAME and SUBDOMAIN combined decide where n8n will be reachable from
# above example would result in: https://n8n.example.com

# Optional timezone to set which gets used by Cron-Node by default
# If not set New York time will be used
GENERIC_TIMEZONE=Europe/Berlin

# The email address to use for the SSL certificate creation
SSL_EMAIL=user@example.com
7. Create data folder#
Create the Docker volume that's defined as n8n_data. n8n will save the database file from SQLite and the encryption key in this volume.
sudo docker volume create n8n_dataCreate a volume for the Traefik data, This is defined as traefik_data.
sudo docker volume create traefik_data8. Start Docker Compose#
n8n can now be started via:
sudo docker compose up -dTo stop the container:
sudo docker compose stop9. Done#
n8n will now be reachable using the above defined subdomain + domain combination. The above example would result in: https://n8n.example.com
n8n will only be reachable using https and not using http.
Secure your n8n instance
Make sure that you set up authentication for your n8n instance.
Next steps#
- Learn more about configuring and scaling n8n.
- Or explore using n8n: try the Quickstarts.
Instalação N8N docker com worker
Link: https://github.com/n8n-io/n8n-hosting/tree/main/docker-compose
git clone https://github.com/n8n-io/n8n-hosting.git
Download: https://github.com/n8n-io/n8n-hosting/tree/main/docker-compose/withPostgresAndWorker
| Name |
Last commit date
|
|
|---|---|---|
parent directory..
|
||
|
|
8 months ago
|
|
|
|
last year
|
|
|
|
8 months ago
|
|
|
|
last year
|
|
n8n with PostgreSQL and Worker
Starts n8n with PostgreSQL as database, and the Worker as a separate container.
Start
To start n8n simply start docker-compose by executing the following command in the current folder.
IMPORTANT: But before you do that change the default users and passwords in the .env file!
docker-compose up -dTo stop it execute:
docker-compose stopConfiguration
The default name of the database, user and password for PostgreSQL can be changed in the .env file in the current directory.
Instalação, configuração e atualização N8N Docker
Link: https://docs.n8n.io/hosting/installation/docker/
Docker Installation#
Docker offers the following advantages:
- Install n8n in a clean environment.
- Easier setup for your preferred database.
- Can avoid issues due to different operating systems, as Docker provides a consistent system.
You can also use n8n in Docker with Docker Compose. You can find Docker Compose configurations for various architectures in the n8n-hosting repository.
Prerequisites#
Before proceeding, install Docker Desktop.
Linux Users
Docker Desktop is available for Mac and Windows. Linux users must install Docker Engine and Docker Compose individually for your distribution.
Self-hosting knowledge prerequisites
Self-hosting n8n requires technical knowledge, including:
- Setting up and configuring servers and containers
- Managing application resources and scaling
- Securing servers and applications
- Configuring n8n
n8n recommends self-hosting for expert users. Mistakes can lead to data loss, security issues, and downtime. If you aren't experienced at managing servers, n8n recommends n8n Cloud.
Latest and Next versions
n8n releases a new minor version most weeks. The latest version is for production use. next is the most recent release. You should treat next as a beta: it may be unstable. To report issues, use the forum.
Current latest: 1.72.1
Current next: 1.73.1
Starting n8n#
From your terminal, run:
1 2 3 |
|
This command will download all required n8n images and start your container, exposed on port 5678. To save your work between container restarts, it also mounts a docker volume, n8n_data, to persist your data locally.
You can then access n8n by opening: http://localhost:5678
Using alternate databases#
By default n8n uses SQLite to save credentials, past executions and workflows. n8n also supports PostgresDB configurable using environment variables as detailed below.
It's important to still persist data in the /home/node/.n8n folder as it contains n8n user data and even more importantly the encryption key for credentials. It's also the name of the webhook when the n8n tunnel is used.
If no directory is found, n8n creates automatically one on startup. In this case, existing credentials saved with a different encryption key can not be used anymore.
Keep in mind
Persisting the /home/node/.n8n directory even when using alternate databases is the recommended best practice, but not explicitly required. The encryption key can be provided using the N8N_ENCRYPTION_KEY environment variable.
PostgresDB#
To use n8n with Postgres, provide the corresponding:
1 2 3 4 5 6 7 8 9 10 11 12 13 14 |
|
A complete docker-compose file for Postgres can be found here.
Setting timezone#
To define the timezone n8n should use, the environment variable GENERIC_TIMEZONE can be set. This gets used by schedule based nodes such as the Cron node.
The timezone of the system can also be set separately. This controls what some scripts and commands return like $ date. The system timezone can be set using the environment variable TZ.
Example using the same timezone for both:
1 2 3 4 5 6 7 8 9 |
|
Updating#
From your Docker Desktop, navigate to the Images tab and select Pull from the context menu to download the latest n8n image:

You can also use the command line to pull the latest, or a specific version:
1 2 3 4 5 6 7 8 |
|
Stop the container and start it again. You can also use the command line:
1 2 3 4 5 6 7 8 9 10 11 |
|
Docker Compose#
If you run n8n using a Docker Compose file, follow these steps to update n8n:
1 2 3 4 5 6 7 8 |
|
Further reading#
More information about Docker setup can be found in the README file of the Docker Image.
n8n with tunnel#
Danger
Use this for local development and testing. It isn't safe to use it in production.
To be able to use webhooks for trigger nodes of external services like GitHub, n8n has to be reachable from the web. n8n has a tunnel service which redirects requests from n8n's servers to your local n8n instance.
Start n8n with --tunnel by running:
1 2 3 4 5 6 7 8 |
|
Next steps#
- Learn more about configuring and scaling n8n.
- Or explore using n8n: try the Quickstarts.
Aplicações N8N docker
Templates de aplicações desenvolvidas em N8N
Local AI with Docker, n8n, Qdrant, and Ollama
Link: https://www.datacamp.com/tutorial/local-ai
Companies worldwide are increasingly concerned about protecting sensitive information while harnessing the power of AI. This guide presents a comprehensive solution for building secure, local AI applications using a powerful combination of open-source tools.
We will use the Self-hosted AI Starter Kit to quickly set up a local AI environment. This kit will automatically run Ollama, Qdrant, n8n, and Postgres. Additionally, we will learn how to build an AI workflow for a RAG (Retrieval-augmented generation) chatbot using the Harry Potter dataset through the n8n dashboard.
Whether you are a developer, data scientist, or non-technical professional looking to implement secure AI solutions, this tutorial will provide you with the foundation to create powerful, self-hosted AI workflows while maintaining complete control over your sensitive data.
What is Local AI?
Local AI allows you to run artificial intelligence systems and workflows on your own infrastructure rather than cloud services, providing enhanced privacy and cost efficiency.
If you are new to the AI ecosystem, you should first check out our skill track on AI Fundamentals to get up to speed. By completing this series of courses, you will gain actionable knowledge on popular AI topics such as ChatGPT, large language models, generative AI, and more.
Here is the list of tools that we will use to build and run our local AI applications:
- Docker: This is your containerization platform that packages all AI components into manageable, isolated environments. It will help us run all the AI tools with a single command.
- n8n: A workflow automation framework that allows you to build AI workflows using a drag-and-drop interface. It requires no coding knowledge, making it ideal for non-technical individuals.
- Postgres: This tool stores all data and logs, acting as a memory buffer for the n8n framework.
- Qdrant: A vector database and search engine that makes AI-generated content searchable and manageable.
- Ollama: An AI model manager that enables you to run any open-source large language model locally with minimal hardware requirements.
The n8n is our primary framework for building the AI workflow for the RAG Chatbot. We will use Qdrant as the vector store and Ollama as the AI model provider. Together, these components will help us create the RAG system.
Installing Docker
We will download and install the Docker desktop application by going to the official Docker website. It is quite easy to install and get started.
Learn more about Docker by following the Docker for Data Science tutorial or take our Introduction to Docker course.
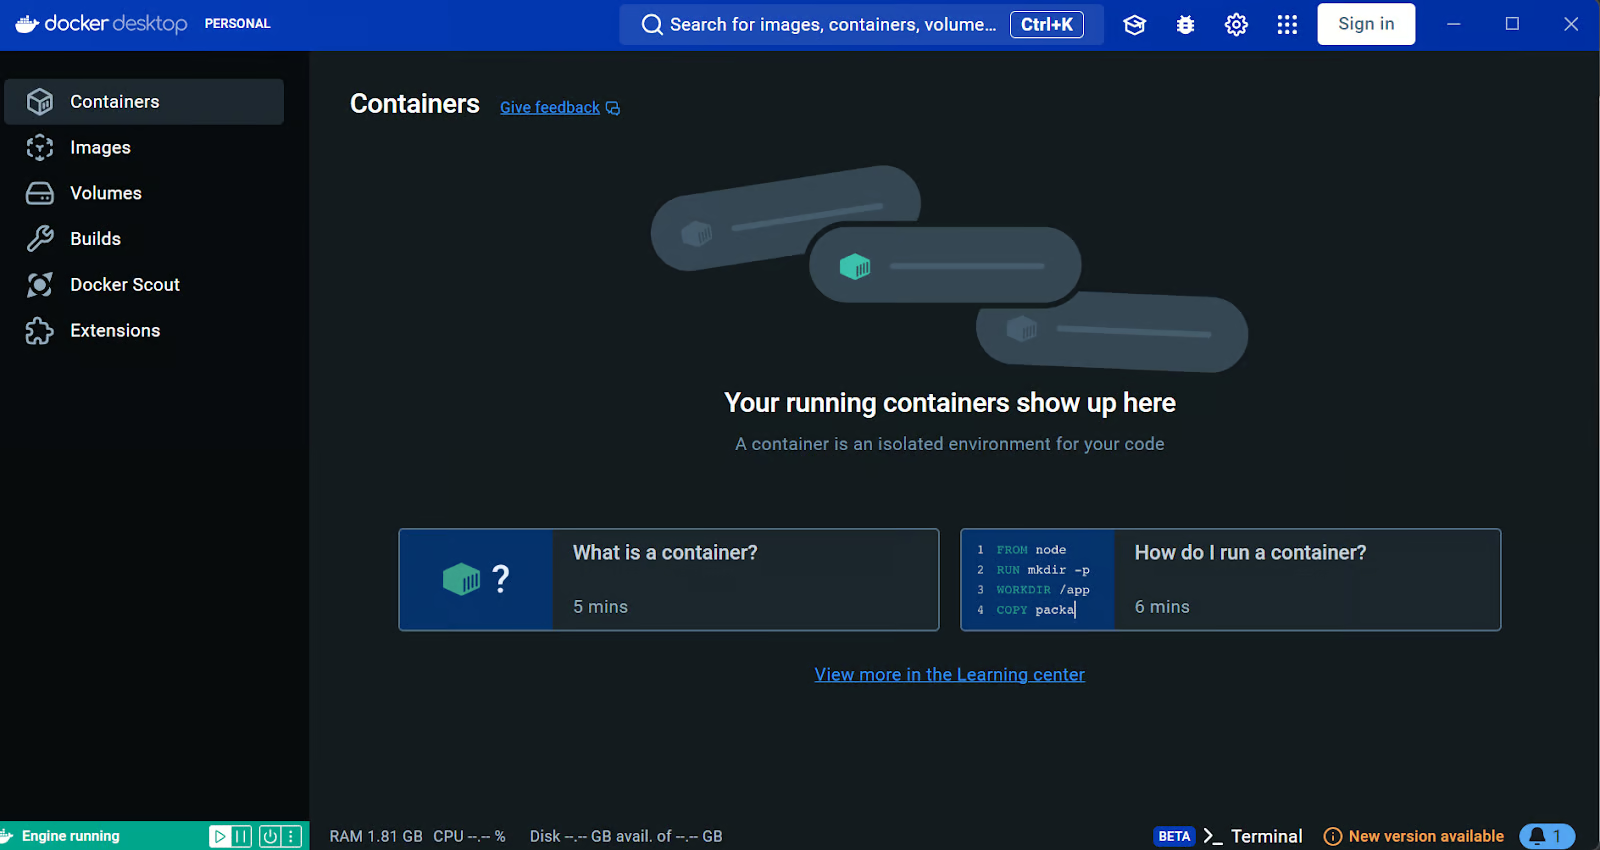
Source: Docker: Accelerated Container Application Development
Windows users need an additional tool to successfully run Docker containers: the Windows Subsystem for Linux (WSL). This allows developers to install a Linux distribution and use Linux applications directly on Windows.
To install WSL on Windows, type the following command in the terminal or PowerShell. Make sure to launch PowerShell as an administrator.
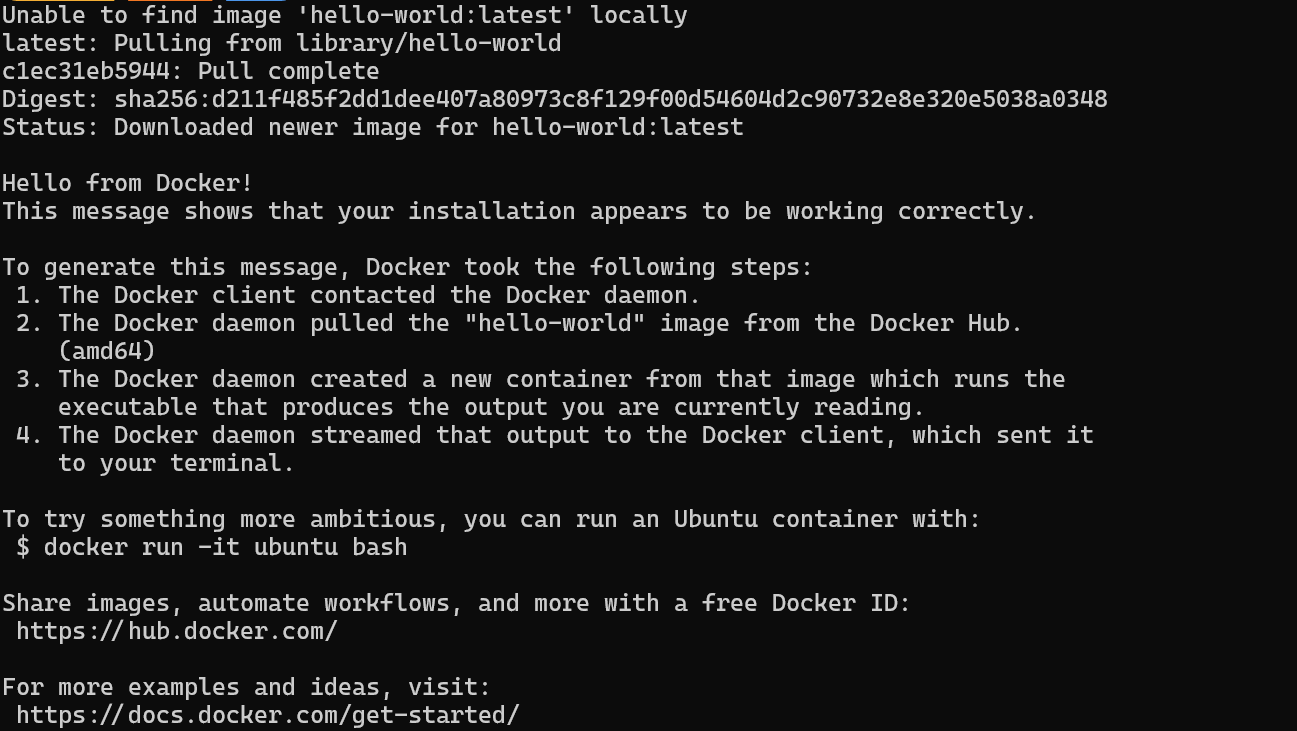
$ wsl --installAfter successfully installing WSL, restart your system. Then, type the following command in PowerShell to check if Docker is working properly.
$ docker run hello-worldDocker successfully pulled the hello-world image and started the container.
Installing and Running Local AI Applications with Docker Compose
In this guide, we will learn how to use Docker Compose to set up AI services locally. This approach allows you to load Docker images and deploy containers within minutes, providing a simple way to run and manage multiple AI services on your infrastructure.
First, we will clone n8n-io/self-hosted-ai-starter-kit by typing the following command in the terminal.
$ git clone https://github.com/n8n-io/self-hosted-ai-starter-kit.git
$ cd self-hosted-ai-starter-kit
This code snippet consists of two Bash commands:
-
git clone https://github.com/n8n-io/self-hosted-ai-starter-kit.git: This command uses Git to create a local copy (clone) of the repository located at the specified URL. The repository contains the "self-hosted-ai-starter-kit" project files. -
cd self-hosted-ai-starter-kit: This command changes the current directory to the newly cloned "self-hosted-ai-starter-kit" directory, allowing you to work with the project files.
Overall, these commands aim to download a project from GitHub and navigate into its directory to start working on it.
The starter kit is the easiest way to set up the servers and applications needed to build an AI workflow. Then, we will load the Docker images and run the containers.
$ docker compose --profile cpu upThe code snippet is a command to start Docker containers using Docker Compose. Here's a breakdown:
docker compose: This is the command to use Docker Compose, a tool for defining and running multi-container Docker applications.--profile cpu: This option specifies a profile named "cpu." Profiles allow you to selectively enable services defined in yourdocker-compose.ymlfile. Only the services associated with the "cpu" profile will be started.up: This command starts the containers defined in yourdocker-compose.ymlfile. It creates and starts the containers in the foreground, showing their logs in your terminal.
Overall, this command starts the Docker containers associated with the "cpu" profile, allowing you to run a specific subset of your application.
If you have an NVIDIA GPU, try typing the command below to access the acceleration in response generation. Also, set up the NVIDIA GPU for Docker by following the Ollama Docker guide.
$ docker compose --profile gpu-nvidia upThe code snippet is a command to start Docker containers using Docker Compose with a specific profile. Here's a breakdown:
docker compose: This is the command to use Docker Compose, a tool for defining and running multi-container Docker applications.--profile gpu-nvidia: This flag specifies a profile namedgpu-nvidia. Profiles allow you to define different sets of services or configurations in yourdocker-compose.ymlfile. Thegpu-nvidiaprofile likely includes services or configurations optimized for NVIDIA GPU usage.up: This command starts the services defined in thedocker-compose.ymlfile. It builds, (re)creates, starts, and attaches to containers for a service.
Overall, this command aims to start up the Docker containers associated with the gpu-nvidia profile, which might be configured to leverage NVIDIA GPUs for tasks like machine learning or other GPU-intensive applications.
It will take a few minutes as it downloads all the Docker images and then runs the Docker containers one by one.
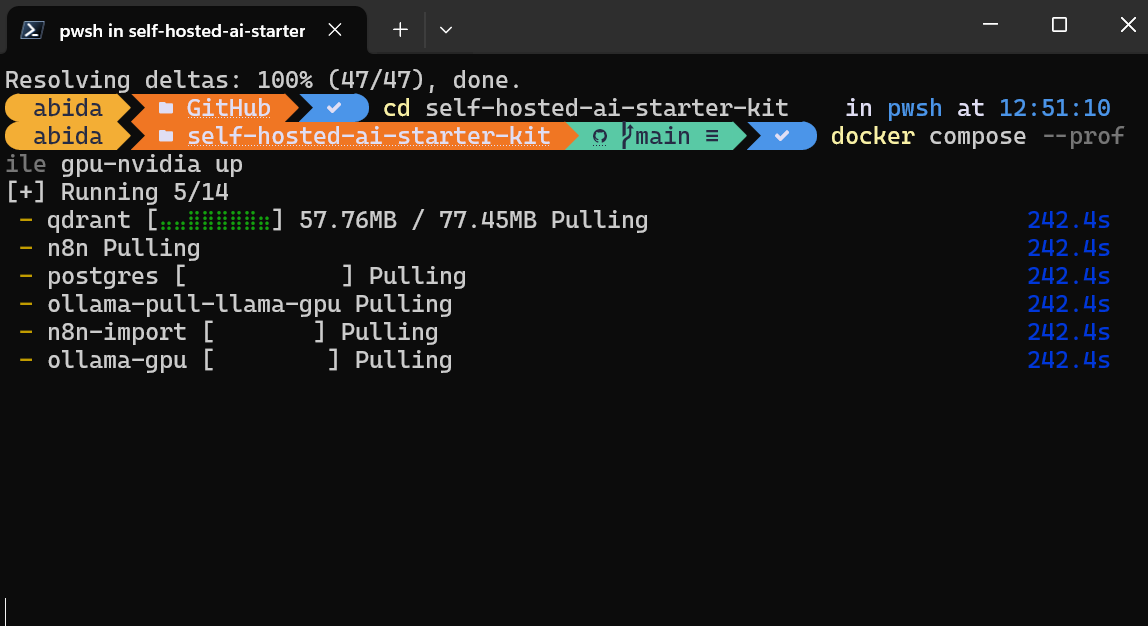
All the Docker services are running. The exited Docker containers were used to download the Llama 3.2 model and import the n8n backup workflow.
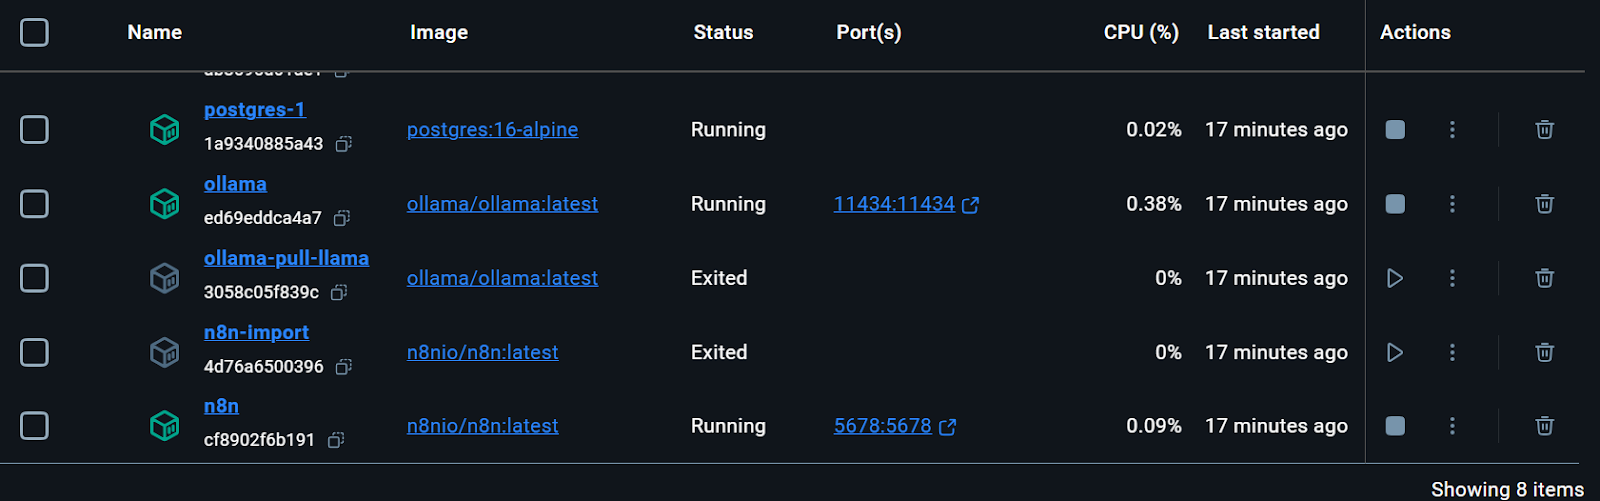
We can even check the status of running the docker container by typing the following command in the terminal.
$ docker compose psThe command docker compose ps is used to list the status of containers defined in a Docker Compose setup. When you run this command, it shows you a table of all the containers in your current Docker Compose project, including their names, states (e.g., running, exited), and other relevant details like ports. This is useful for quickly checking which containers are up and running and their current status.
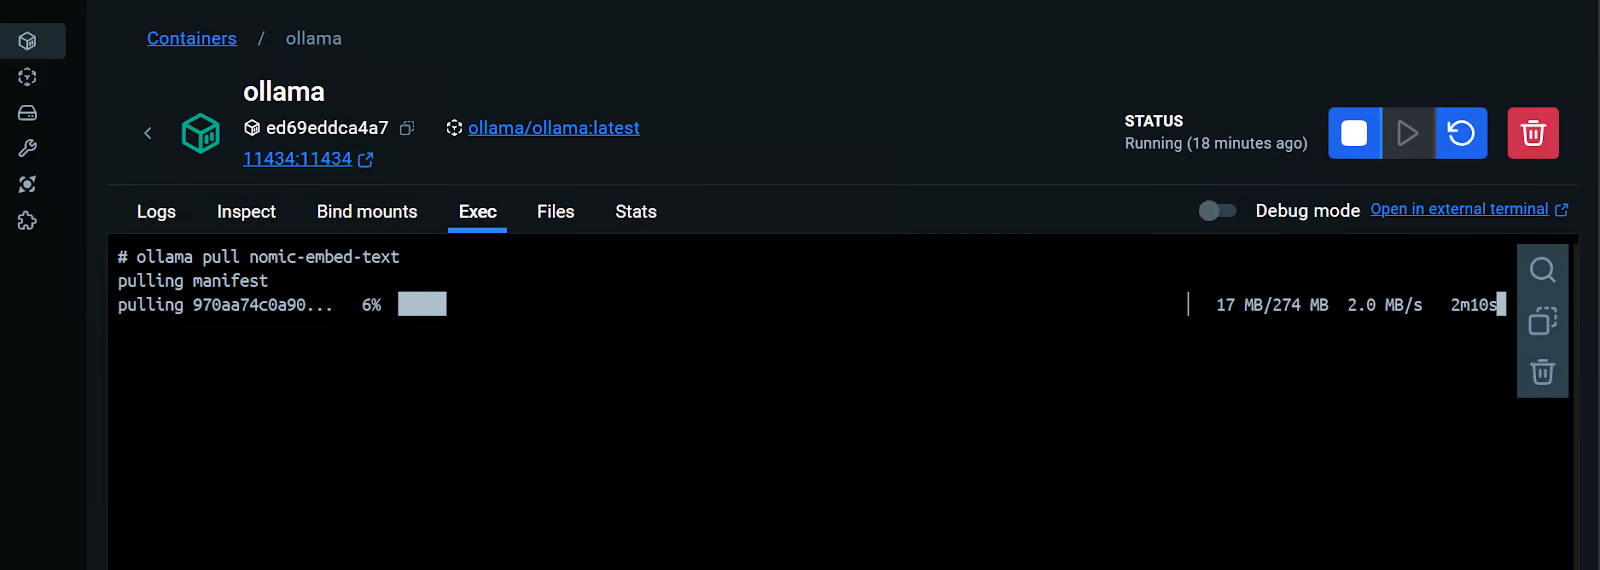
The starter kit included the script for downloading the Llama 3.2 model. However, for a proper RAG Chatbot application, we also need the embedding model. We will go to the Ollama Docker container, click on the “Exec” tab, and type the following command to download the “nomic-embed-text” model.
$ ollama pull nomic-embed-textThe code snippet is a Bash command that uses the ollama tool to pull a specific resource called nomic-embed-text.
ollama: This is likely a command-line tool or utility that manages or interacts with resources or models.pull: This subcommand is used to download or retrieve the specified resource.nomic-embed-text: This is the name of the resource or model being pulled.
The command aims to download or update the nomic-embed-text resource to your local environment using the ollama tool.
As we can see, we can interact with a Docker container as if it were a separate virtual machine.
Open the n8n dashboard URL http://localhost:5678/ in your browser to set up an n8n user account with email and password. Then, click the home button on the main dashboard page and access the Demo workflow.
The demo is a simple LLM workflow that takes the user input and generates the response.
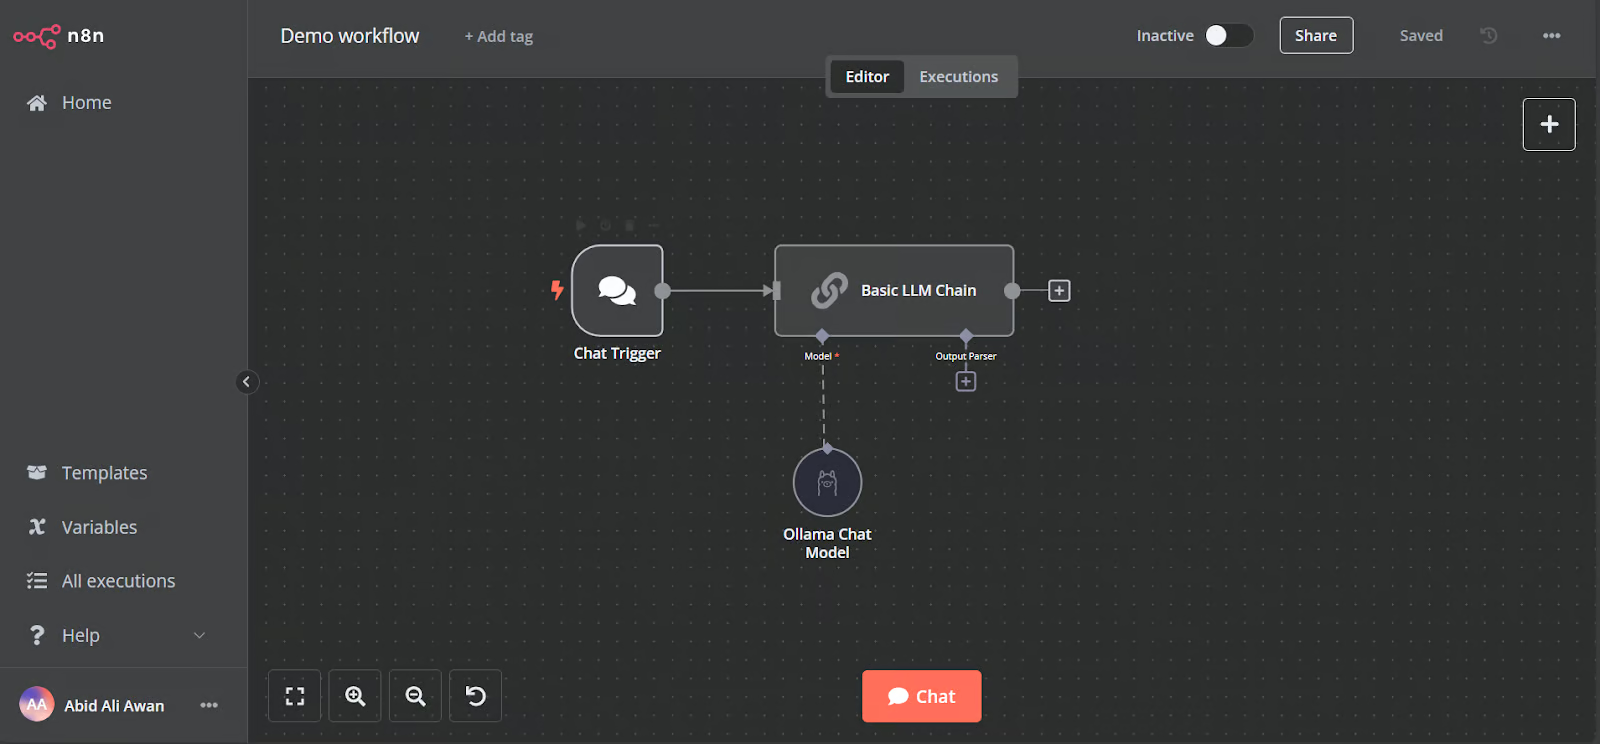
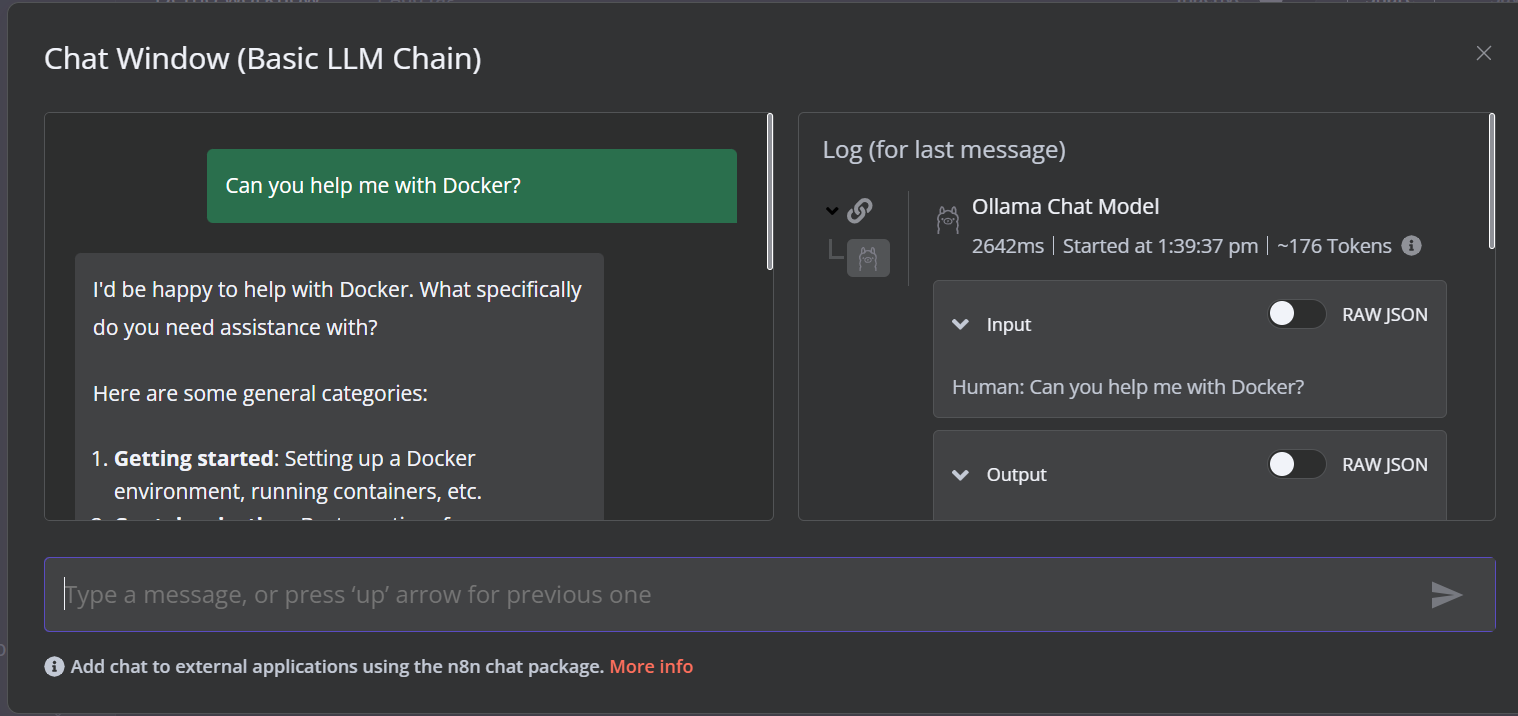
To run the workflow, click on the Chat button and start typing your question. Within a few seconds, a response will be generated.
Please note that we are using a small language model with GPU acceleration, so the response typically takes only about 2 seconds.
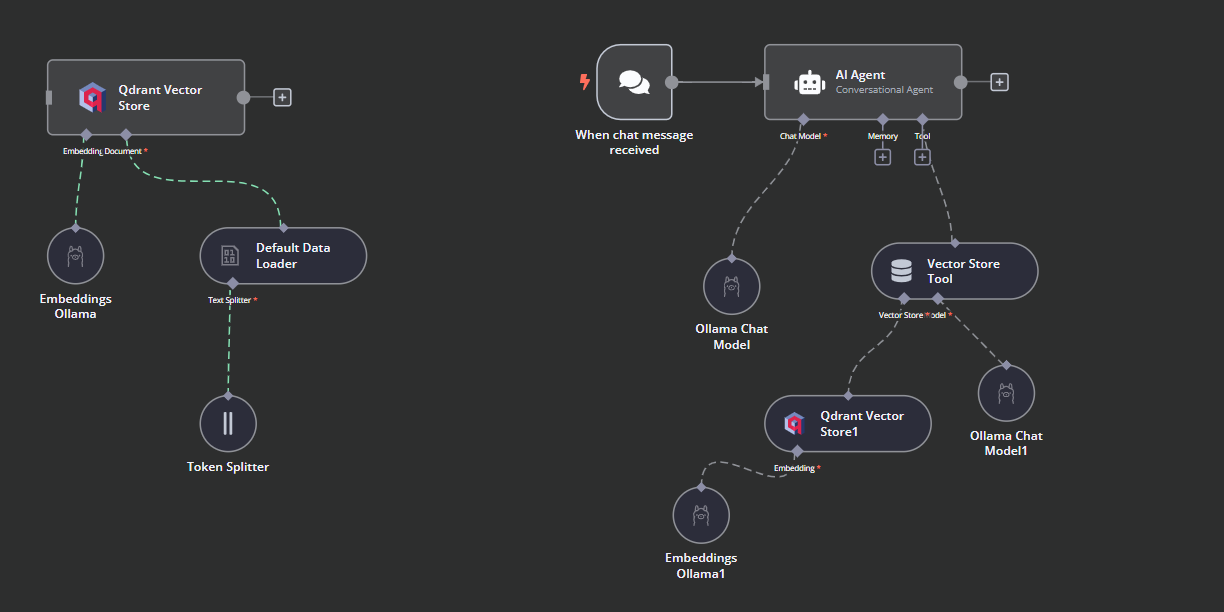
Create the AI Workflow with a n8n Dashboard
In this project, we will build a RAG (Retrieval-Augmented Generation) chatbot that uses data from the Harry Potter movies to provide context-aware and accurate responses. This project is a no-code solution, meaning all you need to do is search for the necessary workflow components and connect them to create an AI workflow.
n8n is a no-code platform similar to Langchain. Follow the RAG with Llama 3.1 8B, Ollama, and Langchain tutorial to get an overview of how to create a similar AI workflow using Langchain.
1. Adding the chat trigger
Click on the “Add the first step” button in the middle of the dashboard, search for the “Chat Trigger,” and add it.
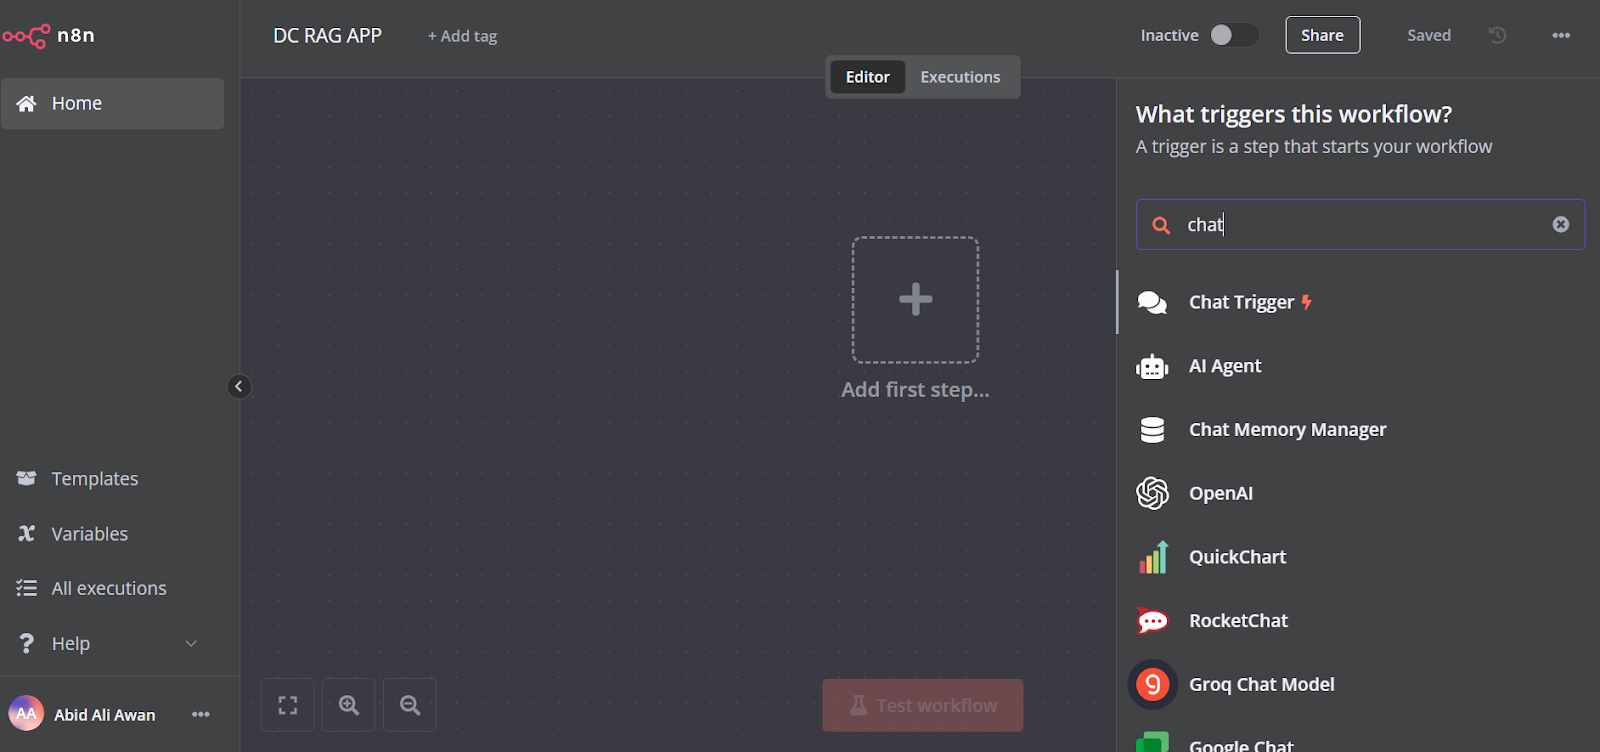
Make sure you have enabled “Allow File Uploads”.

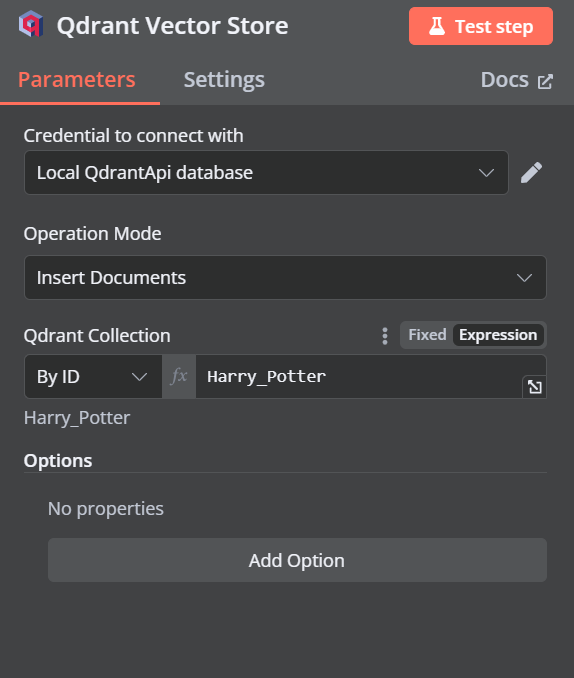
2. Adding the Qdrant vector store
You can add another component called “Qdrant Vector Store” by clicking on the plus (+) button on the “Chat Trigger” component and searching for it.
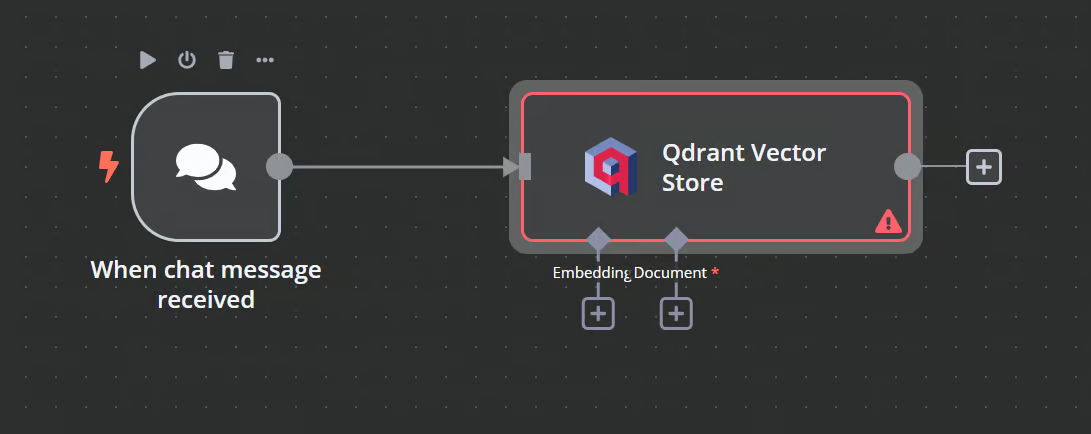
Change the operation mode to “Insert Documents,” change the Qdrant collection to “By ID,” and type the ID as “Harry_Potter.”
When we exit the option, we will see that the chat trigger is connected with our vector store.
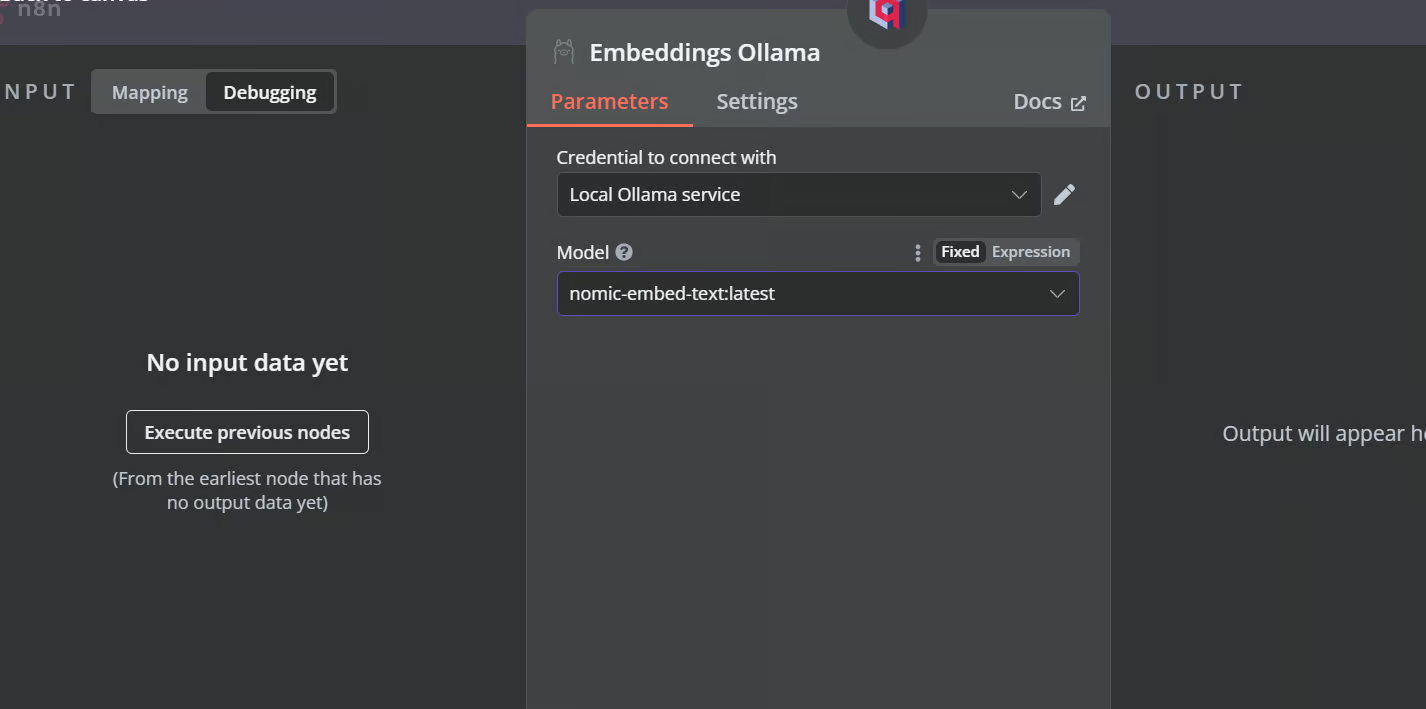
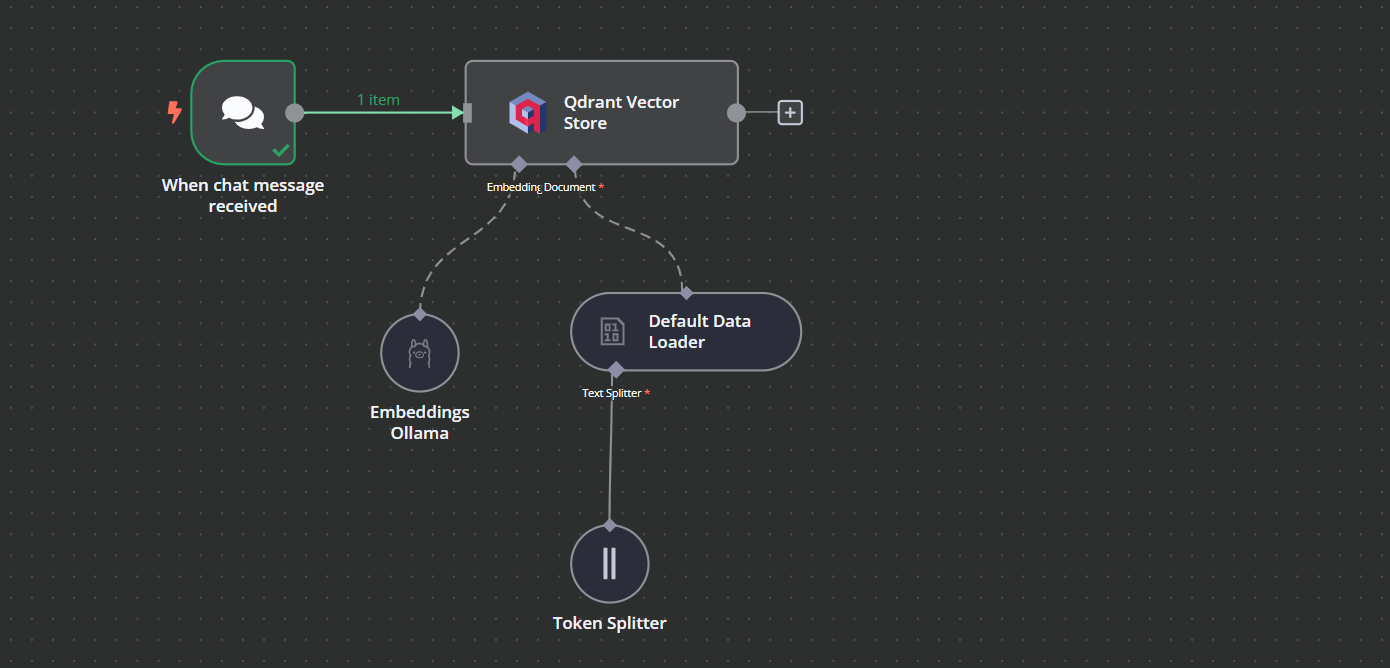
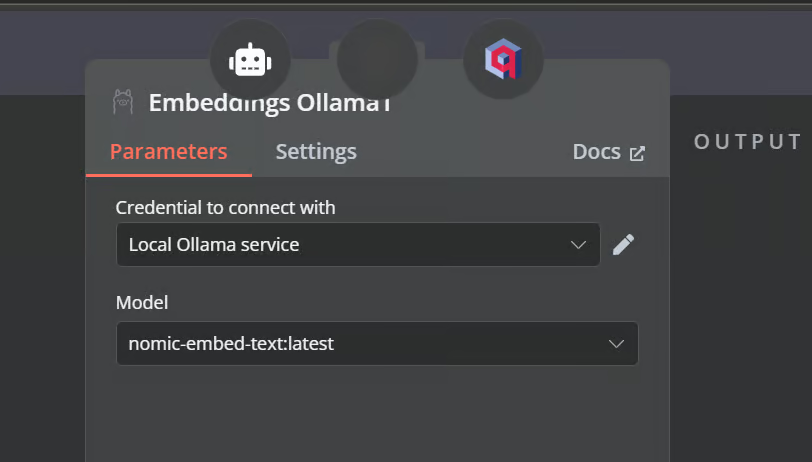
3. Connecting the embedding model with vector store
Click the plus button under the Qdrant vector store labeled “Embedding.” We will be taken to the model management menu, where we will select embeddings Ollama and change the model to “nomic-embed-text:latest.”
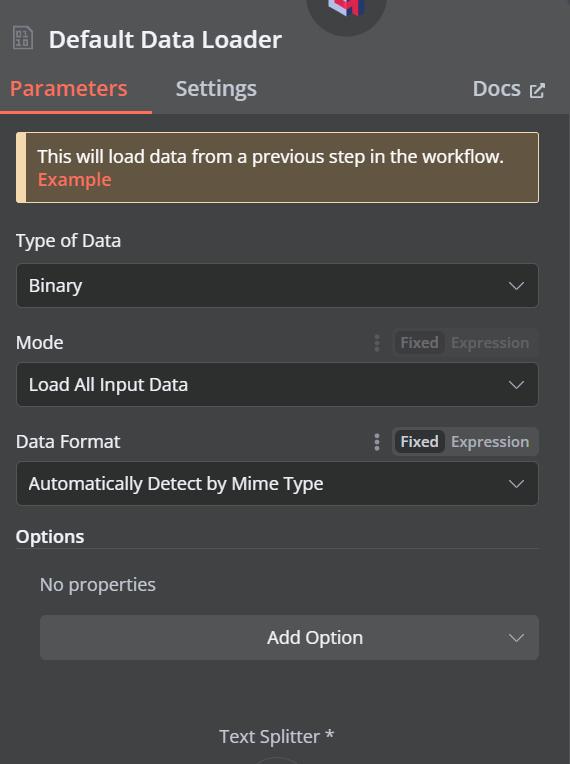
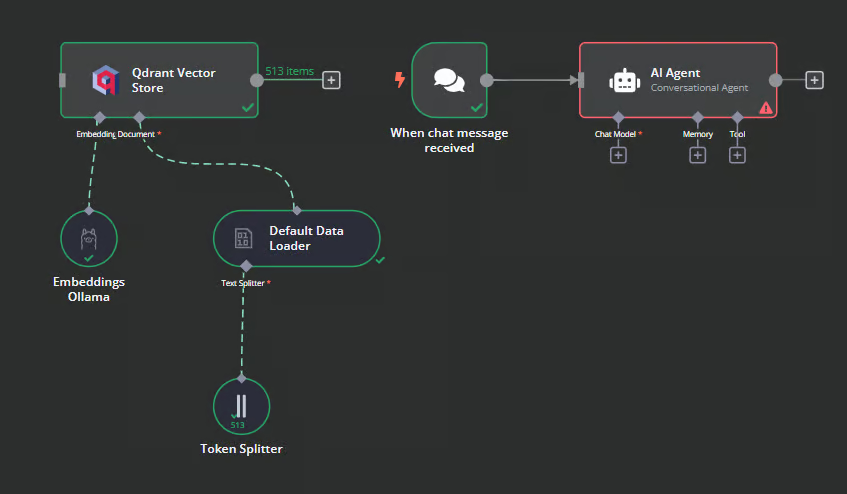
4. Connecting the document loader with vector store
Click the plus button under the Qdrant vector store that says “Document,” and select “Default Data Loader” from the menu. Change the type of the data to “Binary”.
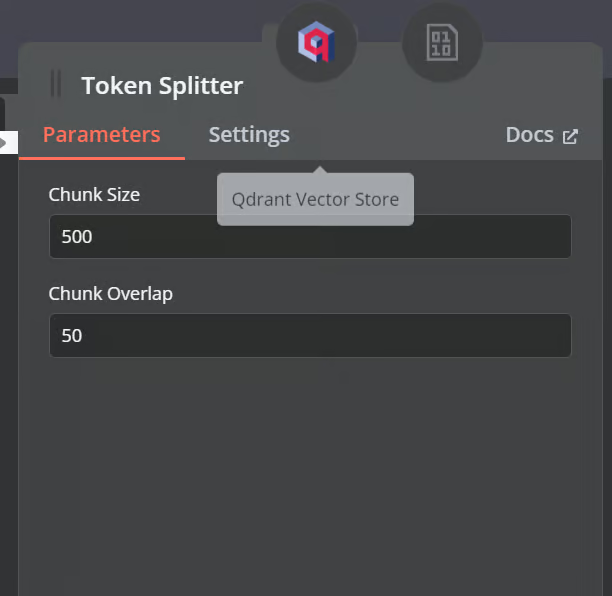
Then, add a token splitter with a chunk size of 500 and a chunk overlap of 50 will be added to the document loader.
This is how our workflow should look in the end. This workflow will take the CSV files from the user, convert them into text, then transform the text into embeddings and store them in the vector store.
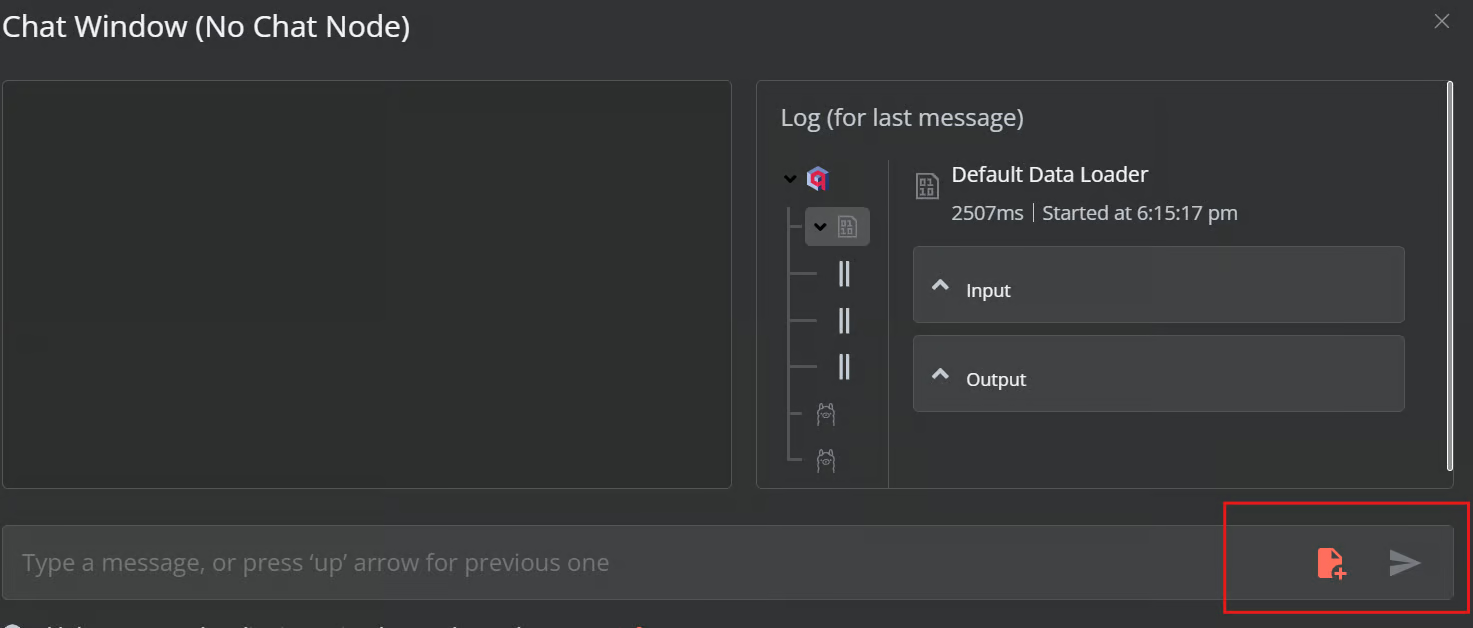
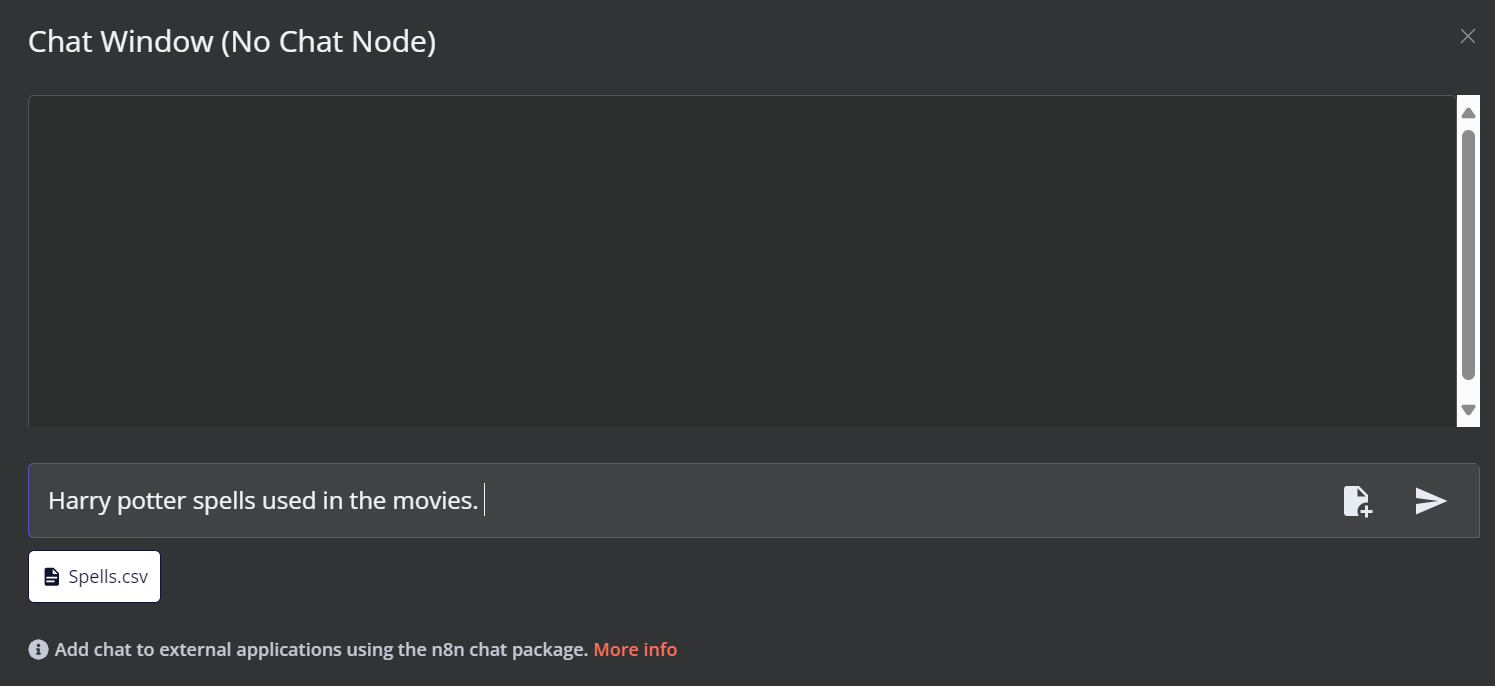
5. Testing the Qdrant vector store
Click the Chat button at the bottom of the dashboard. Once the chat window opens, click on the file button as shown below.
In this workflow, we will load all the CSV files from the Harry Potter Movies dataset. However, to test our workflow, we will only load a single CSV file called 'spell' based on a user query.
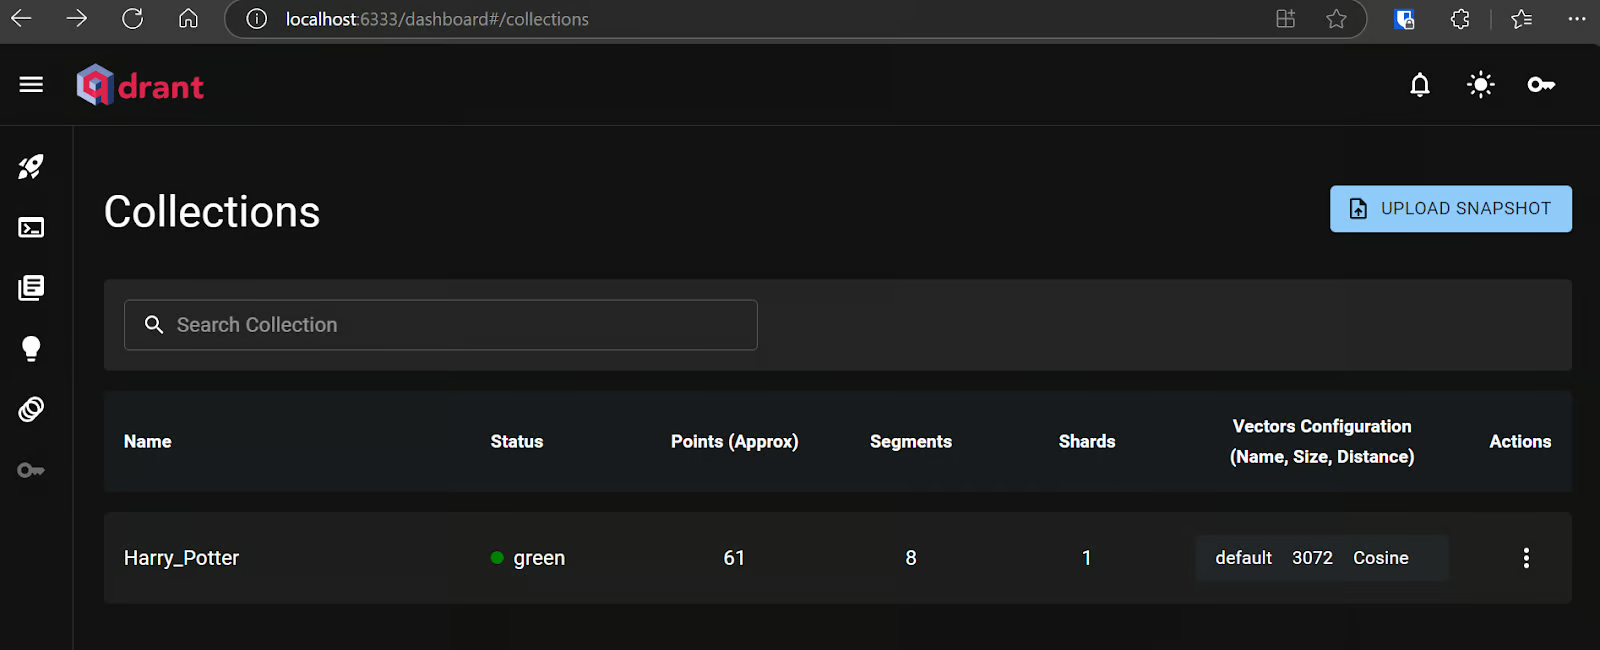
You can go to the Qdrant server using the URL http://localhost:6333/dashboard and check if the file was loaded to the vector store or note.
Now, add the rest of the files to the vector store.

6. Adding the AI agent
We will connect the chat trigger to the vector store, link it to the AI agent, and change the agent type to “Conversation Agent.”
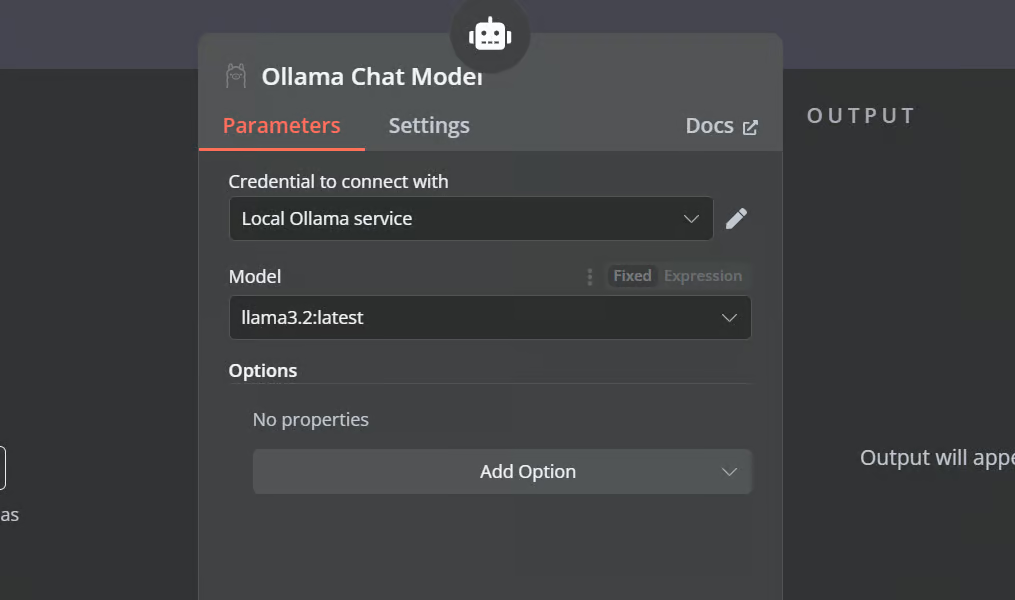
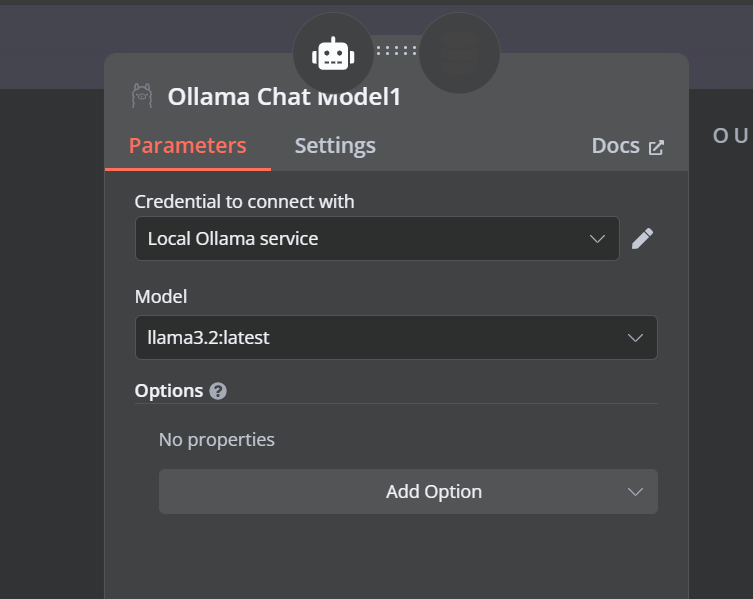
7. Connecting the chat model with AI agent
Click the “Chat Model” button under AI agent and select the Ollama Chat model from the menu. After that, chant the model name to “Llama3.2:latest”.
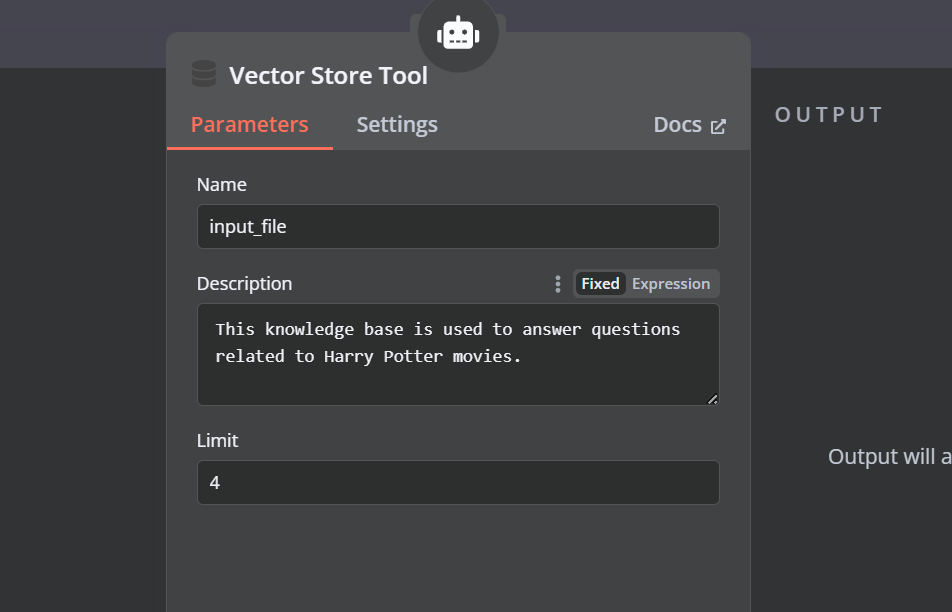
8. Connecting the vector store tool with AI agent
Click the “Tool” button under the AI agent and select the vector store tool from the menu. Provide the tool name and the description.
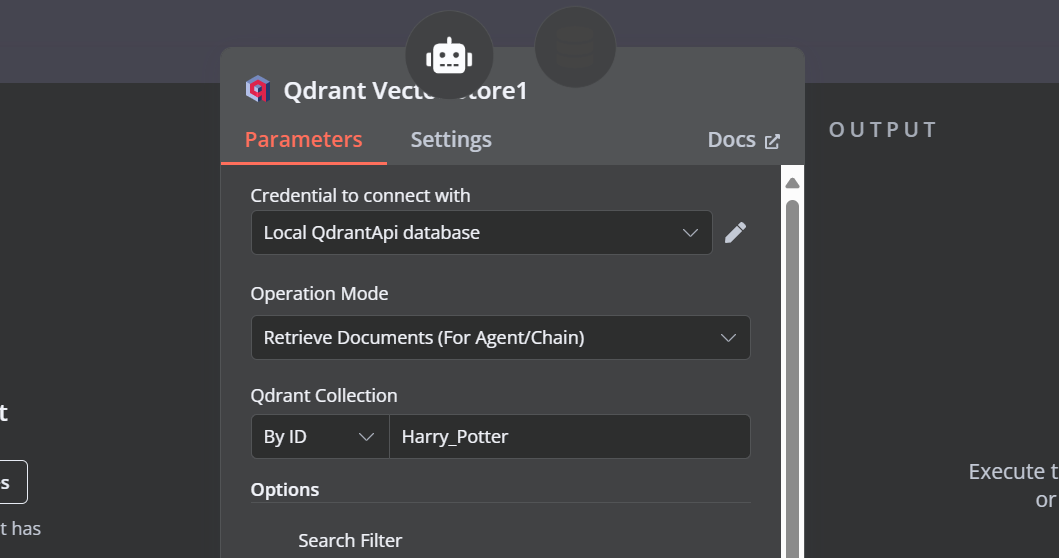
9. Connecting the Qdrant retriever with the vector store tool
We need to add components to the vector store tool. First, we will incorporate Qdrant as the vector store and set the collection ID to "Harry_Potter." This vector store will access the Harry Potter collection during the similarity search. Additionally, change the operation mode to "Retrieved Documents."
10. Connecting the chat model with the vector store tool
The vector store tool also requires an LLM model. We will connect the Ollama chat model and change the model to the “llama3.2:latest”.
11. Connecting the embedding model with the Qdrant retriever
In the final step, we will supply the retrieval vector store with the embedding model. This allows it to convert the user query into an embedding and then convert the embedding back into text for the LLM to process.
Make sure you provide the correct embedding model for your vector store.
This is how the AI workflow should look like.
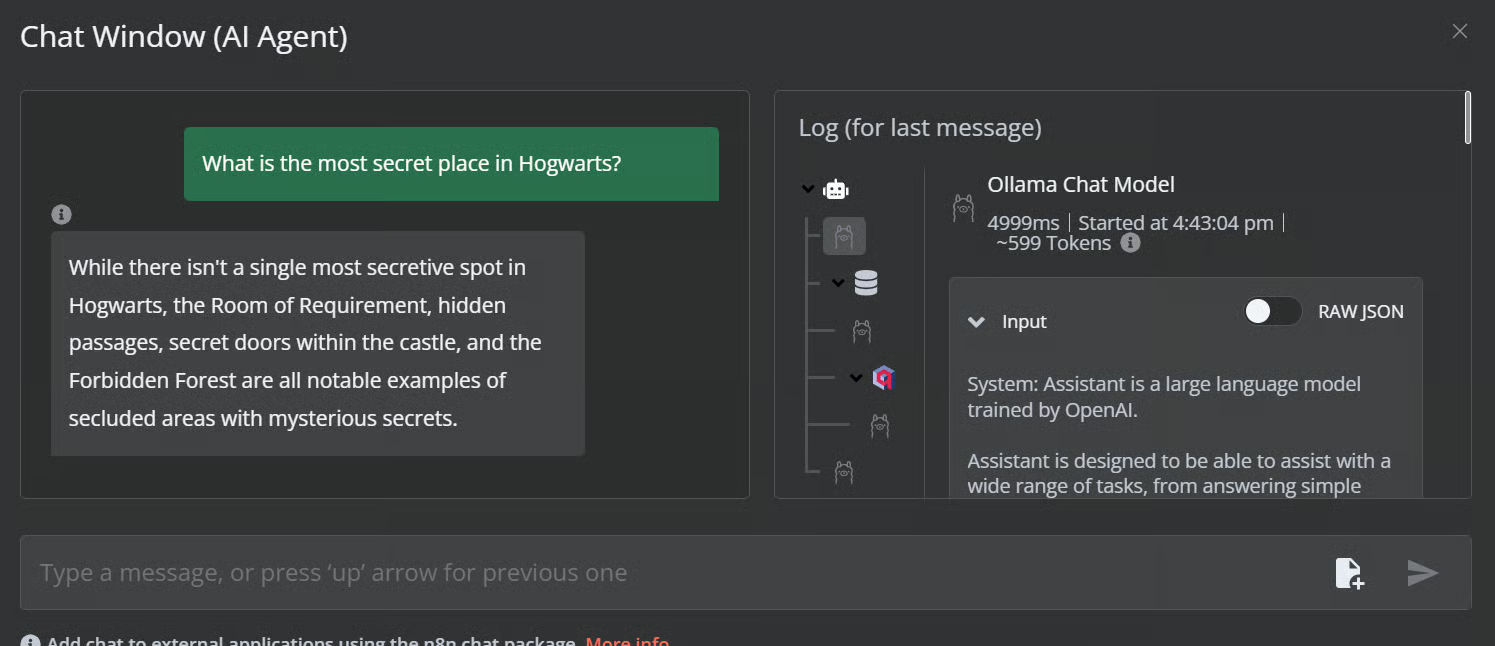
12. Testing the AI workflow
Click the chat button to start asking questions about the Harry Potter universe.
Prompt: “What is the most secret place in Hogwarts?”
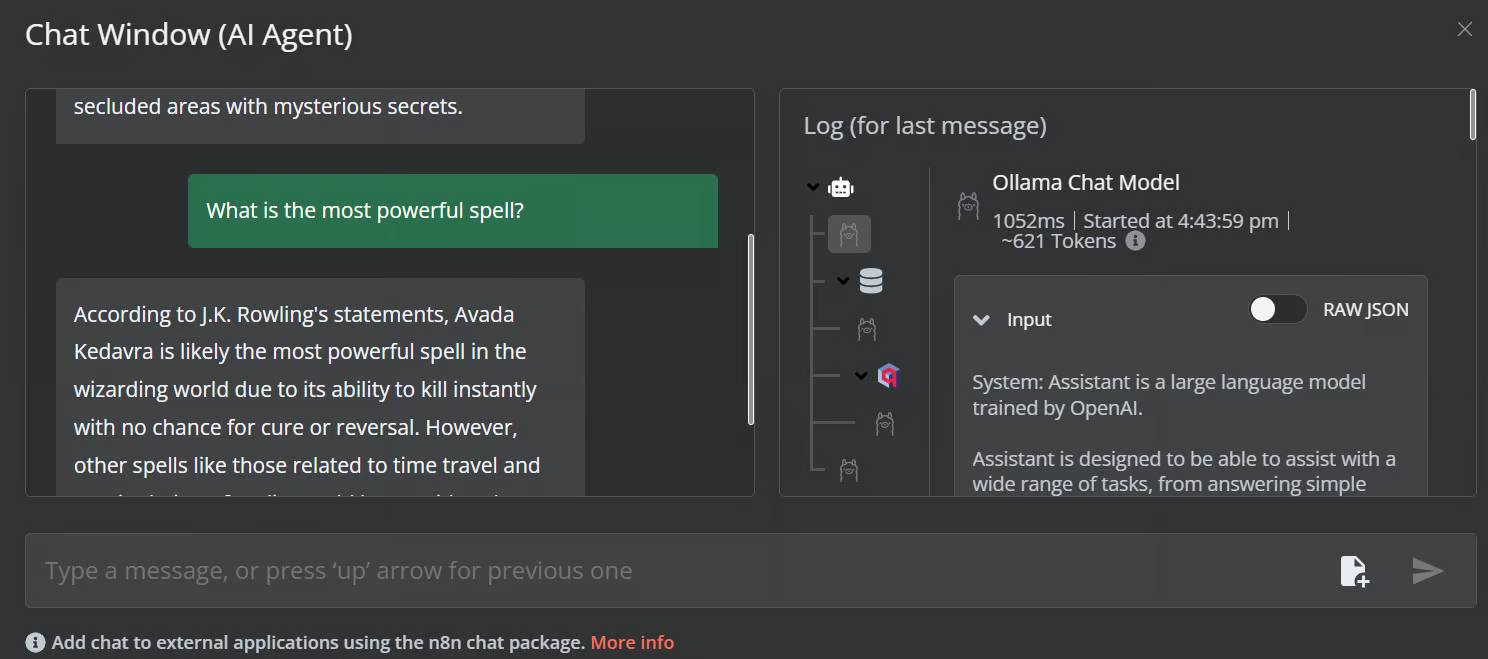
Prompt: “What is the most powerful spell?”
Our AI workflow is fast and functioning smoothly. This no-code approach is quite easy to execute. n8n also allows users to share their applications so that anyone can access them using a link, just like a ChatGPT.
Conclusion
n8n is a perfect tool for LLM/AI projects, especially for non-technical individuals. Sometimes, we don’t even have to create the workflow from scratch. All we need to do is search for similar projects on the n8n website, copy the JSON code, and paste it into our n8n dashboard. It’s that simple.
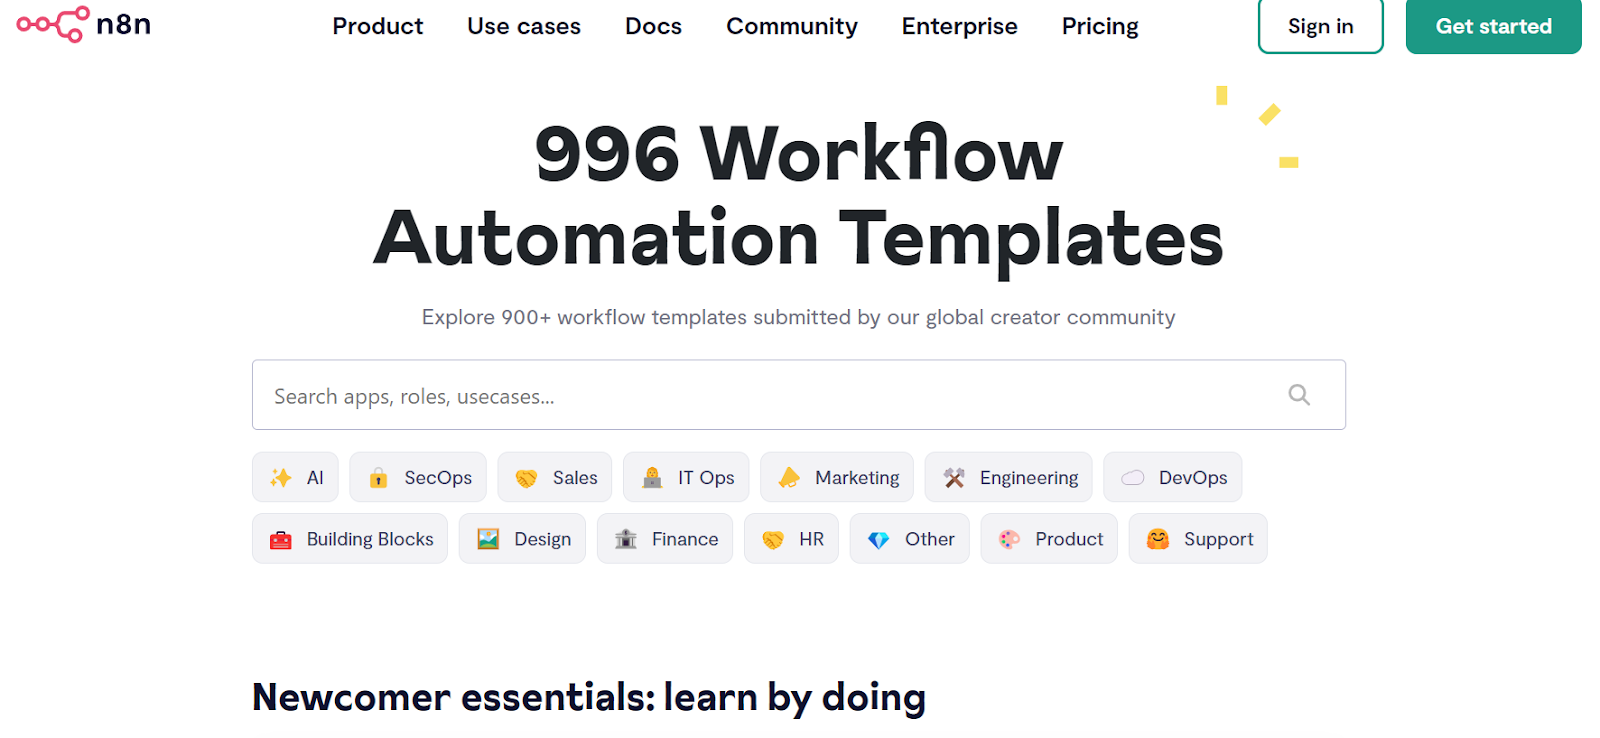
Source: Discover 900+ Automation Workflows from the n8n's Community
In this tutorial, we learned about local AI and how to use the self-hosted AI starter kit to build and deploy various AI services. We then launched the n8n dashboard and created our own AI workflow using Qdrant, embedding models, vector store tools, LLMs, and document loaders. Creating and executing workflows is quite easy with n8n. If you are new to AI tools and want to learn about no-code AI solutions, check out our other resources:
Templates N8N utilizando QDRANT
Link: https://n8n.io/workflows/?integrations=Qdrant%20Vector%20Store
Building RAG Chatbot for Movie Recommendations with Qdrant and Open AI
Scale Deal Flow with a Pitch Deck AI Vision, Chatbot and QDrant Vector Store
Are you a popular tech startup accelerator (named after a particular higher order function) overwhelmed with 1000s of pitch decks on a daily basis? Wish you could filter through them quickly using AI but the decks are unparseable through conventional means? Then you're in luck!
This n8n template uses Multimodal LLMs to parse and extract valuable data from even the most overly designed pitch decks in quick fashion. Not only that, it'll also create the foundations of a RAG chatbot at the end so you or your colleagues can drill down into the details if needed. With this template, you'll scale your capacity to find interesting companies you'd otherwise miss!
Build a Financial Documents Assistant using Qdrant and Mistral.ai
https://n8n.io/workflows/2335-build-a-financial-documents-assistant-using-qdrant-and-mistralai/
This n8n workflow demonstrates how to manage your Qdrant vector store when there is a need to keep it in sync with local files. It covers creating, updating and deleting vector store records ensuring our chatbot assistant is never outdated or misleading.
This workflow depends on local files accessed through the local filesystem and so will only work on a self-hosted version of n8n at this time. It is possible to amend this workflow to work on n8n cloud by replacing the local file trigger and read file nodes.
Customer Insights with Qdrant, Python and Information Extractor
Build a Financial Documents Assistant using Qdrant and Mistral.ai
Link: https://n8n.io/workflows/2335-build-a-financial-documents-assistant-using-qdrant-and-mistralai/
This n8n workflow demonstrates how to manage your Qdrant vector store when there is a need to keep it in sync with local files. It covers creating, updating and deleting vector store records ensuring our chatbot assistant is never outdated or misleading.
Disclaimer
This workflow depends on local files accessed through the local filesystem and so will only work on a self-hosted version of n8n at this time. It is possible to amend this workflow to work on n8n cloud by replacing the local file trigger and read file nodes.
How it works
- A local directory where bank statements are downloaded to is monitored via a local file trigger. The trigger watches for the file create, file changed and file deleted events.
- When a file is created, its contents are uploaded to the vector store.
- When a file is updated, its previous records are replaced.
- When the file is deleted, the corresponding records are also removed from the vector store.
- A simple Question and Answer Chatbot is setup to answer any questions about the bank statements in the system.
Requirements
- A self-hosted version of n8n. Some of the nodes used in this workflow only work with the local filesystem.
- Qdrant instance to store the records.
Customising the workflow
This workflow can also work with remote data. Try integrating accounting or CRM software to build a managed system for payroll, invoices and more.
Want to go fully local?
A version of this workflow is available which uses Ollama instead. You can download this template here: https://drive.google.com/file/d/189F1fNOiw6naNSlSwnyLVEm_Ho_IFfdM/view?usp=sharing
Links de Aplicações N8N
Popular ways to use Read/Write Files from Disk integration
Distributed Deployment of Qdrant Cluster with Sharding & Replicas
Segregating your vector data into multiple nodes to enhance resiliency, scalability, and performance.
Problem Statement
In this blog, we are going to address the challenges faced by a single node Qdrant setup. And then we are going to demonstrate how we can overcome it by deploying a distributed node setup. By the end of this blog, you will have both a conceptual understanding of distributed networks as well as the technical know-hows of setting it up.
Key Features of a Distributed Deployment Setup in Qdrant
To understand what distributed deployment is, it is important to first understand the following features:
Single Node Qdrant
A single node Qdrant setup uses one server to store and manage all the data and processes. It is less expensive and simpler to set up, but has notable drawbacks. If the server goes down for any reason, such as maintenance or a breakdown, the entire Qdrant service will become unavailable. Furthermore, the performance of the service is limited to what a single server can handle.
Qdrant Cluster
A Qdrant Cluster is a more advanced setup that involves multiple servers, known as nodes, working together. This arrangement distributes the data and workload among several servers, which offers multiple benefits over a single node setup. It’s more resilient because if one server has an issue, the others can keep the service running. It also allows for scalability, meaning more servers can be added as needed to handle more data or more user requests, thus enhancing overall performance.
Cluster Communication
In a cluster, the servers communicate using the Raft consensus protocol. This protocol helps keep the servers synchronized, ensuring that they all agree upon any changes or updates before they are made. This coordination is crucial for maintaining data accuracy and consistency across the cluster.
For operations on individual points though, Qdrant prioritizes speed and availability over strict adherence to this protocol, which allows for faster processing without the complexity of coordinating every detail across all servers.
Sharding
Sharding is a technique to break down a database into different segments. In Qdrant, a collection can be divided into multiple shards, each representing a self-contained store of points.
This distribution allows for parallel processing of search requests, leading to significant performance improvements. Qdrant supports both automatic sharding, where points are distributed based on a consistent hashing algorithm, and user-defined sharding, offering more control over data placement for specific use cases.
Importance of Distributed Development
Distributed development, which involves spreading out data and processing across multiple locations or servers, is essential for creating systems that are reliable and can scale according to demand. In the context of Qdrant, this approach offers several key advantages:
- Resilience: By distributing operations across multiple servers, the system can still function even if one server fails.
- Scalability: It’s easier to handle more data and more users by adding more servers to the system.
- Performance: Distributing the workload helps speed up data processing and retrieval by allowing multiple operations to run in parallel across different servers.
How to Launch a Multi-Node Cluster on Qdrant
We’ll use Docker Compose to launch a 4-node Qdrant Cluster setup. First create a file called docker-compose.yml and paste the following in it:
services:
  qdrant_node1:
    image: qdrant/qdrant:v1.9.1
    container_name: qdrant_node1
    volumes:
      - ./data/node1:/qdrant/storage
    ports:
      - "6333:6333"
    environment:
      QDRANT__CLUSTER__ENABLED: "true"
    command: "./qdrant --uri http://qdrant_node1:6335"


  qdrant_node2:
    image: qdrant/qdrant:v1.9.1
    container_name: qdrant_node2
    volumes:
      - ./data/node2:/qdrant/storage
    depends_on:
      - qdrant_node1
    environment:
      QDRANT__CLUSTER__ENABLED: "true"
    command: "./qdrant --bootstrap http://qdrant_node1:6335 --uri http://qdrant_node2:6335"


  qdrant_node3:
    image: qdrant/qdrant:v1.9.1
    container_name: qdrant_node3
    volumes:
      - ./data/node3:/qdrant/storage
    depends_on:
      - qdrant_node1
    environment:
      QDRANT__CLUSTER__ENABLED: "true"
    command: "./qdrant --bootstrap http://qdrant_node1:6335 --uri http://qdrant_node3:6335"


  qdrant_node4:
    image: qdrant/qdrant:v1.9.1
    container_name: qdrant_node4
    volumes:
      - ./data/node4:/qdrant/storage
    depends_on:
      - qdrant_node1
    environment:
      QDRANT__CLUSTER__ENABLED: "true"
    command: "./qdrant --bootstrap http://qdrant_node1:6335 --uri http://qdrant_node4:6335"
The Docker Compose file defines four services, each corresponding to a Qdrant node in the cluster. Here’s what each section generally specifies:
Common elements for all nodes:
- image: Specifies the Docker image to use for the container. All nodes use qdrant/qdrant:v1.9.1.
- container_name: Assigns a unique name to each container running a Qdrant node.
- volumes: Maps a local directory (./data/nodeX) to a directory inside the container (/qdrant/storage). This setup is used for data persistence across container restarts.
- environment: Sets environment variables inside the container. QDRANT__CLUSTER__ENABLED: “true” enables cluster mode in each Qdrant node.
Specifics for individual nodes:
- qdrant_node1
- ports: Maps port 6333 on the host to port 6333 on the container, used for API access to the Qdrant service.
- command: Specifies the command to run inside the container. For qdrant_node1, it initializes with its own URI for cluster communication (http://qdrant_node1:6335).
- qdrant_node2, qdrant_node3, qdrant_node4
- depends_on: Ensures that these nodes start only after qdrant_node1 has started. This dependency is crucial because the subsequent nodes need to connect to the first node for cluster setup.
- command: For these nodes, the command includes both a — bootstrap option pointing to qdrant_node1 (to join the cluster) and a — uri with their own unique URI. This setup is necessary for proper communication within the cluster.
To launch the cluster, run the following command:
docker-compose up
Now you can access the cluster via the Qdrant client:
from qdrant_client import QdrantClient

# Initialize the Qdrant client
client = QdrantClient(host="localhost", port=6333)
Next, let’s define the collection and the shard_key.
collection_name = "sharding_collection"
key = "tempKey"


# Deleting an existing collection if it exists
response = client.delete_collection(collection_name=f"{collection_name}")


# Creating a new collection with specific configuration
response = client.create_collection(
    collection_name=f"{collection_name}",
    shard_number=6,
    sharding_method=models.ShardingMethod.CUSTOM,
    vectors_config=models.VectorParams(size=768, distance=models.Distance.COSINE),
    replication_factor= 2,
)


# Creating a shard key for the collection
response = client.create_shard_key(f"{collection_name}", f"{key}")
Shard Number implies the number of shards per Shard Key. Replication factor implies the number of times the shards are replicated evenly across all the nodes.
In this case, since we have defined only 1 Shard Key, the total number of Physical Shards would be 1*6*2 = 12.
Now let’s input some random vectors into our cluster using the shard key.
# Counter for generating unique point IDs
point_counter = 0


# Function to generate a random vector of 768 dimensions with up to 15 decimal points
def generate_random_vector():
    return [round(random.uniform(0, 1), 15) for _ in range(768)]


# Run the loop 1000 times
for _ in range(1000):
    random_vector = generate_random_vector()
    point_counter += 1
    response = client.upsert(
        collection_name=f"{collection_name}",
        points=[
            models.PointStruct(
                id=point_counter,
                vector=random_vector,
            ),
        ],
        shard_key_selector=f"{key}",
    )
What Happens When We Turn Off a Node?
If we have configured our setup to be a 3+ node cluster with a replication factor of at least 2, then even if we stop one node, it’s not going to affect any operations going on in the cluster.
Let’s test that out.
First get ids of the containers using:
docker ps
Now let’s stop qdrant_node3.
docker stop 0b7fac4c224a
Next, let’s investigate our collection.
Even though we switched off a node, we can still access all the points we’ve inserted into our collection!
Data Distribution between Shards
To see how the data is distributed amongst the shards, we need to make a GET request in the following manner.
curl localhost:6333/collections/sharding_collection/cluster
{“result”:{“peer_id”:2024384091823610,”shard_count”:6,”local_shards”:[{“shard_id”:2,”shard_key”:”tempKey”,”points_count”:135,”state”:”Active”},{“shard_id”:4,”shard_key”:”tempKey”,”points_count”:178,”state”:”Active”},{“shard_id”:6,”shard_key”:”tempKey”,”points_count”:155,”state”:”Active”}],”remote_shards”:[{“shard_id”:1,”shard_key”:”tempKey”,”peer_id”:8555640407930483,”state”:”Active”},{“shard_id”:1,”shard_key”:”tempKey”,”peer_id”:3252676105267795,”state”:”Active”},{“shard_id”:2,”shard_key”:”tempKey”,”peer_id”:3088601394550397,”state”:”Active”},{“shard_id”:3,”shard_key”:”tempKey”,”peer_id”:8555640407930483,”state”:”Active”},{“shard_id”:3,”shard_key”:”tempKey”,”peer_id”:3252676105267795,”state”:”Active”},{“shard_id”:4,”shard_key”:”tempKey”,”peer_id”:3088601394550397,”state”:”Active”},{“shard_id”:5,”shard_key”:”tempKey”,”peer_id”:3252676105267795,”state”:”Active”},{“shard_id”:5,”shard_key”:”tempKey”,”peer_id”:8555640407930483,”state”:”Active”},{“shard_id”:6,”shard_key”:”tempKey”,”peer_id”:3088601394550397,”state”:”Active”}],”shard_transfers”:[]},”status”:”ok”,”time”:0.000067336}
To know the node by their peer_id, we’ll run:
curl http://localhost:6333/cluster
{“result”:{“status”:”enabled”,”peer_id”:2024384091823610,”peers”:{“3252676105267795”:{“uri”:”http://qdrant_node2:6335/"},"8555640407930483":{"uri":"http://qdrant_node3:6335/"},"2024384091823610":{"uri":"http://qdrant_node1:6335/"},"3088601394550397":{"uri":"http://qdrant_node4:6335/"}},"raft_info":{"term":10,"commit":40,"pending_operations":0,"leader":2024384091823610,"role":"Leader","is_voter":true},"consensus_thread_status":{"consensus_thread_status":"working","last_update":"2024-05-22T13:26:49.305470782Z"},"message_send_failures":{}},"status":"ok","time":0.000058492}
Analyzing the above results, and putting them in a clear format, we get:
- Node1 (current peer) has shards 2, 4, and 6.
- Node 3 has shards 1, 3, and 5.
- Node 2 has shards 1, 3, and 5.
- Node 4 has shards 2, 4, and 6.
By looking at the above distribution we see that each shard is available on 2 different nodes, and therefore even if one of the nodes fails, the cluster will continue to function.
Final Words
Multi-node clusters, sharding, and replicas are essential features for production environments. Multi-node clusters distribute the workload and enhance system resilience against individual node failures. Sharding divides data across multiple nodes, facilitating parallel processing that boosts performance and scalability. Replication ensures data availability, even if some nodes fail. Together, these techniques can create a robust and fault-tolerant system capable of reliably handling production-level demands.
References
https://qdrant.tech/documentation/guides/distributed_deployment/
https://github.com/Mohitkr95/qdrant-multi-node-cluster/tree/main