Building a High Availability Cluster with HAProxy, Keepalived, and Docker: A Step-by-Step Guide

High availability (HA) is essential for ensuring that web applications remain accessible, even in the face of hardware or software failures. An HA architecture distributes traffic across multiple servers, preventing any single point of failure from disrupting service. In this article, we’ll explore how to build a high availability cluster using HAProxy and Keepalived, two powerful tools for load balancing and failover.
To enhance flexibility and simplify deployment, we’ll leverage Docker to containerize HAProxy, Keepalived, and our web applications. Docker allows us to create a portable and easily manageable HA setup that can be deployed across different environments, whether on-premises or in the cloud.
Throughout this guide, we’ll walk you through the entire process — from setting up Docker networks and building Dockerfiles to configuring HAProxy and Keepalived for seamless failover. By the end, you’ll have a fully functional HA cluster that ensures your web applications are always available, all within a Dockerized environment.
I-/ General Concepts
Before diving into the different configurations, it’s helpful to understand the core components of the architecture.
I-1/HAproxy
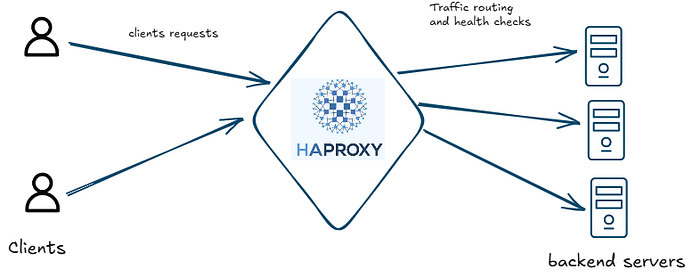
HAProxy, as its name suggests, stands for High Availability Proxy. It is a robust and versatile tool designed to provide high availability and efficient load balancing for network traffic.
HAProxy is a widely used tool for distributing incoming requests across multiple backend servers to enhance both reliability and performance. It performs continuous health checks on these servers to ensure that traffic is routed only to those that are healthy and responsive.
The tool employs various algorithms, such as round-robin and least connections, to effectively balance the load. Supporting both TCP and HTTP traffic, HAProxy operates at Layer 4 (the transport layer) and Layer 7 (the application layer) of the OSI model.
There are two main components when configuring HAproxy , a frontend and a backend section.
- Frontend section: It is the entry point for incoming client requests. It defines how HAProxy listens for incoming traffic and how it should handle these requests, here we specify the address and port on which HAProxy should listen, as well as any rules or conditions for routing the traffic to the appropriate backend by inspecting the incoming packets.
- Backend section: it represents the servers that will handle the requests forwarded by the frontend. we define how HAProxy should route traffic to the backend servers and how it should manage these servers basically we specify also load balancing algorithms, and health checks. In summary we control how requests will be distributed among the servers and how we are going to handle server failures or maintenance.
I-2/Keepalived & VRRP
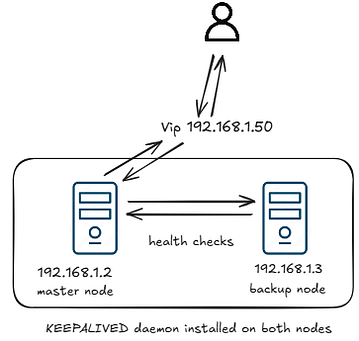
VRRP (Virtual Router Redundancy Protocol) is designed to create a virtual router that represents a group of physical routers, allowing them to work together to present a single virtual IP address (VIP) to the network. This VIP is used as the default gateway by clients.
In a VRRP setup, one router is elected as the master. The master router handles traffic directed to the VIP, while the other routers in the group act as backups and monitor the master router’s health. If the master router fails, one of the backup routers takes over as the new master, ensuring the continuity of service.
Keepalived is a widely used implementation of VRRP with additional features. It assigns a priority to each node in the group, and based on these priorities, it elects a new master if a failure occurs. Keepalived enhances VRRP with advanced health checks and failover capabilities, making it ideal for high-availability setups.
II-/ Deployment architecture
After understanding the foundational concepts of HAProxy and Keepalived, it’s crucial to see how these components come together to form a high availability cluster.
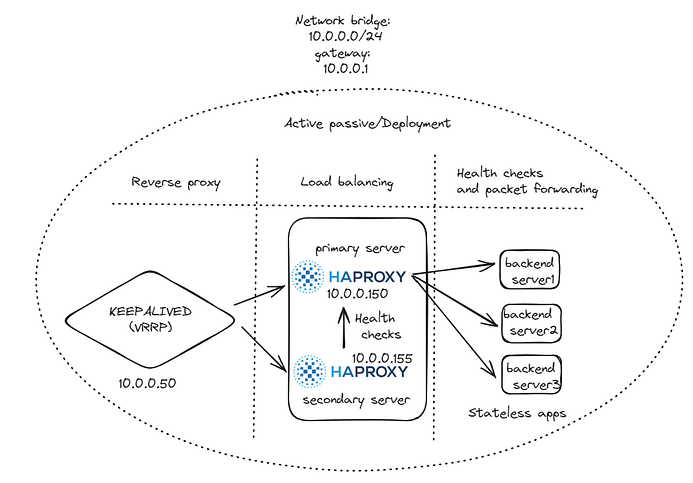
The architecture I’ve implemented leverages Docker to create a resilient and scalable environment, ensuring continuous service availability. The visual representation above illustrates how traffic is routed through HAProxy instances and managed by Keepalived to provide redundancy and failover capabilities.
To interconnect all components, I set up a Docker bridge network, which ensures seamless communication between the HAProxy instances, Keepalived, and the backend servers. This network allows the HAProxy instances to effectively distribute incoming traffic across multiple backend servers while monitoring their health and performance.
In this setup, there is a primary HAProxy instance (the master) and a secondary instance (the backup) ready to take over if the master fails. Keepalived, installed on both machines, manages the virtual IP (VIP) that clients connect to. This VIP ensures that, even in the event of a failure, traffic is automatically redirected to the backup HAProxy instance, maintaining service availability without interruption.
The backend comprises three cloned instances of a server running a simple Flask application that serves static content. This setup is an example of a stateless application deployment, where each instance operates independently without relying on session persistence or shared state. In the case of stateful applications, additional architectural considerations would be necessary, such as implementing shared storage, session replication, sticky sessions, or database clustering to ensure consistency and availability. Following best practices in system design is crucial to address these challenges and optimize the architecture based on the application’s specific requirements and context.
III-/Step by step guide
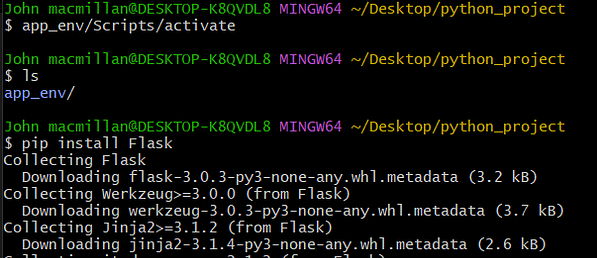
- The first thing we’re going to do is create our stateless app a simple Python application that doesn’t store any session information. To get started, we need to create a virtual environment, so make sure you have Python installed on your machine.
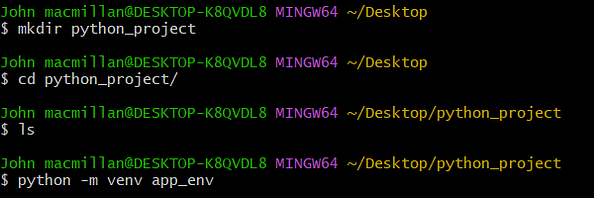
- Activate the virtual environment, and then install Flask.
- Now Flask is installed in our virtual environment, we are going to create a simple Flask App with
hello world!content, for me I’ll use nano editor, you can use whatever editor you want for that purpose.
nano app.py
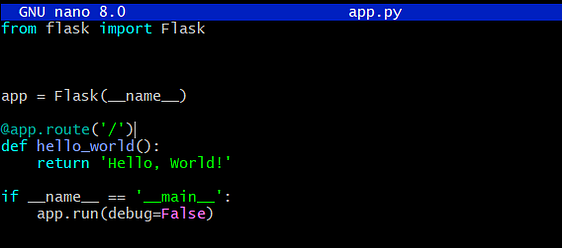
Copy paste the following content or create your own:
from flask import Flask
app = Flask(__name__)

@app.route('/')
def hello_world():
    return 'Hello, World!'

if __name__ == '__main__':
    app.run(debug=False)
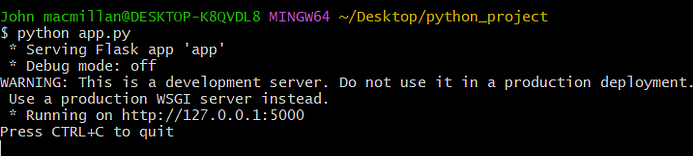
Flask apps run by default in port 5000, you can test the webapp by running: python app.py

The app is up and running Now we should get the dependencies used in our app, we will save them on requirements.txt .
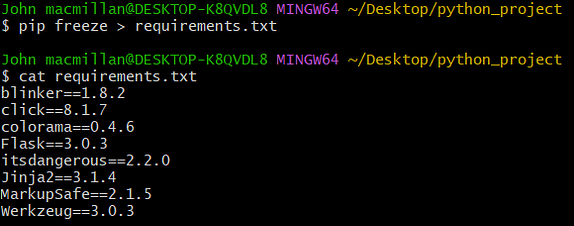
pip freeze > requirements.txt
- We will need these requirements so we can create the Dockerfile of our webapp, then run the following command to create a Dockerfile of the webapp.
nano Dockerfile.webapp
copy and paste the following:
FROM python:3.12.5
Expose 5000
ENV FLASK_app=app.py
WORKDIR /app
COPY ./app.py .
COPY ./requirements.txt .
RUN pip install -r requirements.txt
RUN pip install gunicorn
CMD gunicorn -w 4 -b :5000 app:app
Note that we added Gunicorn in our Dockerfile to run our Python web app because using development servers is not suitable for production environments.
Let’s create our first image , it’ll be saved locally.
docker build -f Dockerfile.webapp -t webapp_test .
After finalizing the Dockerfile for our web app, it’s time to create our Docker Compose YAML file, which will define our entire architecture. We’ll break it down step by step.
Here is the docker compose file.
version: '3.8'

services:
  haproxy1:
    build:
      context: .
      dockerfile: Dockerfile
    container_name: haproxy1
    networks:
      yahya_prive:
        ipv4_address: 10.0.0.150
    cap_add:
      - NET_ADMIN
    ports:
      - "8888:80"
      - "8404:8404"
    volumes:
      - C:\Users\John macmillan\Desktop\python_project\haproxy.cfg:/usr/local/etc/haproxy/haproxy.cfg:ro
      - C:\Users\John macmillan\Desktop\python_project\keepalived_primary.conf:/etc/keepalived/keepalived.conf:ro
    depends_on:
      - web1
      - web2
      - web3
    entrypoint: ["/bin/sh", "-c", "keepalived -D -f /etc/keepalived/keepalived.conf && haproxy -f /usr/local/etc/haproxy/haproxy.cfg"]

  haproxy2:
    build:
      context: .
      dockerfile: Dockerfile
    container_name: haproxy2
    networks:
      yahya_prive:
        ipv4_address: 10.0.0.155
    cap_add:
      - NET_ADMIN
    ports:
      - "8800:80"
      - "8405:8404"
    volumes:
      - C:\Users\John macmillan\Desktop\python_project\haproxy.cfg:/usr/local/etc/haproxy/haproxy.cfg:ro
      - C:\Users\John macmillan\Desktop\python_project\keepalived_bck.conf:/etc/keepalived/keepalived.conf:ro
    depends_on:
      - web1
      - web2
      - web3
    entrypoint: ["/bin/sh", "-c", "keepalived -D -f /etc/keepalived/keepalived.conf && haproxy -f /usr/local/etc/haproxy/haproxy.cfg"]

  web1:
    image: webapp_test
    container_name: web1
    networks:
      - yahya_prive

  web2:
    image: webapp_test
    container_name: web2
    networks:
      - yahya_prive

  web3:
    image: webapp_test
    container_name: web3
    networks:
      - yahya_prive

networks:
  yahya_prive:
   driver: bridge
   #specify the driver
   ipam:
    config :
       - subnet: 10.0.0.0/24
         gateway: 10.0.0.1
let’s break this down:
First thing we did is to create a network bridge . This Network bridge is called yahya_privethen we specified the CIDR notation: 10.0.0.0/24with the following gateway: 10.0.0.1
it’ll be our private network in which all the containers will be assigned an ip address from the ip address range 10.0.0.0/24 .
networks:
  yahya_prive:
   driver: bridge
   #specify the driver
   ipam:
    config :
       - subnet: 10.0.0.0/24
         gateway: 10.0.0.1
It’s advisable to use a custom network rather than the default network provided by Docker Compose. This approach enhances security and allows you to use domain names instead of IP addresses in configurations.
Then there is a section for our webapps, they’re called respectively: web1, web2 and web3, all three of them is now attached to yahya_privenetwork.
Each one was provided a name, and the base image was created previously, and it was saved locally which is webapp_test
web1:
    image: webapp_test
    container_name: web1
    networks:
      - yahya_prive

  web2:
    image: webapp_test
    container_name: web2
    networks:
      - yahya_prive

  web3:
    image: webapp_test
    container_name: web3
    networks:
      - yahya_prive
After this we’ve created the service for our HAProxy load balancer.
haproxy1:
    build:
      context: .
      dockerfile: Dockerfile
    container_name: haproxy1
    networks:
      yahya_prive:
        ipv4_address: 10.0.0.150
    cap_add:
      - NET_ADMIN
    ports:
      - "8888:80"
      - "8404:8404"
    volumes:
      - C:\Users\John macmillan\Desktop\python_project\haproxy.cfg:/usr/local/etc/haproxy/haproxy.cfg:ro
      - C:\Users\John macmillan\Desktop\python_project\keepalived_primary.conf:/etc/keepalived/keepalived.conf:ro
    depends_on:
      - web1
      - web2
      - web3
    entrypoint: ["/bin/sh", "-c", "keepalived -D -f /etc/keepalived/keepalived.conf && haproxy -f /usr/local/etc/haproxy/haproxy.cfg"]
The Master HAProxy is called haproxy1, and it was assigned the ip address:
10.0.0.150from the private network yahya_prive.
To enable Keepalived, which uses VRRP for failover, the container requires additional network capabilities. Therefore, we grant the container NET_ADMIN privileges, allowing it to manage network settings necessary for VRRP operations.
The necessary configuration files for HAProxy and Keepalived are mounted as read-only volumes from the host machine to ensure that both services are properly configured.
The entrypoint directive ensures that Keepalived starts in the background and monitors the HAProxy service, providing the high availability setup.
And obviously, there is the configuration Dockerfile that contains our Keepalived and HAProxy.
FROM ubuntu:22.04

# Install Keepalived and HAProxy
RUN apt-get update && apt-get install -y \
    nano \
 net-tools \
    keepalived \
    haproxy

EXPOSE 80
EXPOSE 8444
The configuration for both load balancers is exactly the same (haproxy.cfg)
global
  stats socket /var/run/api.sock user haproxy group haproxy mode 660 level admin expose-fd listeners
  log stdout format raw local0 info

defaults
  mode http
  timeout client 10s
  timeout connect 5s
  timeout server 10s
  timeout http-request 10s
  log global

frontend stats
  bind *:8404
  stats enable
  stats uri /
  stats refresh 10s

frontend myfrontend
  bind :80
  default_backend webservers

backend webservers
server s1 web1:5000 check
server s2 web2:5000 check
server s3 web3:5000 check
What we’ve done here is configure our load balancer to listen for requests on port 80. We’ve also defined our web servers in the backend webservers section, allowing us to route traffic to them effectively.
On the other hand, we had different configurations of Keepalived daemons for both nodes.
here is the configuration for the master node (keepalived_primary.conf):
vrrp_instance VI_1 {
    state MASTER
    interface eth0
    virtual_router_id 33
    priority 255
    advert_int 1
    unicast_src_ip 10.0.0.50

    authentication {
        auth_type PASS
        auth_pass letmein
    }

    virtual_ipaddress {
        10.0.0.50/24 dev eth0
    }
}
This is a basic configuration where we’ve assigned a priority of 255, which is higher than the priority set on the backup machine. As a result, this machine will be assigned the virtual IP address first. We’ve defined the state as MASTER for this machine and specified eth0 as the interface, as it’s connected to the private network through this interface.
The most critical part of this configuration is the virtual_ipaddress section, where we define the virtual IP address (10.0.0.50/24) that will be managed by the VRRP protocol. This IP address will be assigned to the master machine, ensuring that it handles traffic as long as it remains in the master state. The authentication section provides basic security by requiring a password for VRRP communications, adding an extra layer of protection to the setup.
The configuration for the backup node will be different a little bit (keepalived_bck.conf):
vrrp_instance VI_1 {
    state BACKUP
    interface eth0
    virtual_router_id 33
    priority 150
    advert_int 1
    unicast_src_ip 10.0.0.50

    authentication {
        auth_type PASS
        auth_pass letmein
    }

    virtual_ipaddress {
        10.0.0.50/24 dev eth0
    }
}
We’ve set a priority of 150, which is lower than that of the master, and designated the state as BACKUP. Both the master and backup nodes share the same virtual IP address (VIP). In the event of the master node failing, the backup node will detect this through ARP checks and automatically take over the VIP, ensuring continued service availability.
Note that the Docker Compose file includes a depends_on section that specifies the order in which containers are started. In this case:
depends_on:
      - web1
      - web2
      - web3
This configuration ensures that the web applications (web1, web2, and web3) start before the load balancers are initialized. This order is crucial to ensure that the web servers are up and running before the load balancers begin routing traffic to them.
After completing the necessary configurations, you can run the entire setup with the following command:
docker-compose -p high_availability_cluster up -d
Now, your setup is up and running.

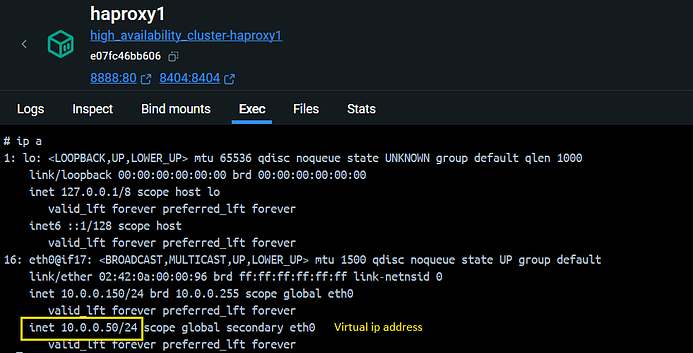
The haproxy1 container will receive the virtual IP address on its eth0 interface. You can verify this by running the following command inside the container: ip a.
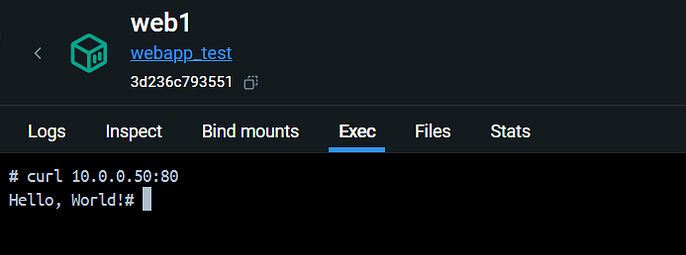
We can try sending an HTTP request using the curl command from a node inside the yahya_prive network. For example, we can use web1 for this purpose.
IV-/Conclusion
In conclusion, building a high availability cluster with HAProxy, Keepalived, and Docker is an effective way to ensure continuous service availability and reliability. Through this guide, we’ve explored the fundamental concepts of high availability, examined how HAProxy and Keepalived work together to manage traffic and failover, and demonstrated how to set up this architecture in a Docker environment. By following these steps, you can create a resilient infrastructure that can handle disruptions and maintain service continuity, making it an essential setup for any robust and scalable application deployment.
Equipped with this understanding, you’ll now be able to enhance your network infrastructure and deploy more resilient, scalable applications with confidence.
We invite you to share your experiences and insights in the comments below. We’re eager to hear your feedback and thoughts. Happy networking!
References
For more detailed information :
No comments to display
No comments to display